Skip to content
About
Contact
Cookie Policy
Copyright Policy
Disclaimer
Search
Home
Dinner
Appetizer
Desserts
Drinks
About
Contact
Privacy Policy
Toggle Menu
Home
/
Appetizer
- Page 2
Appetizer
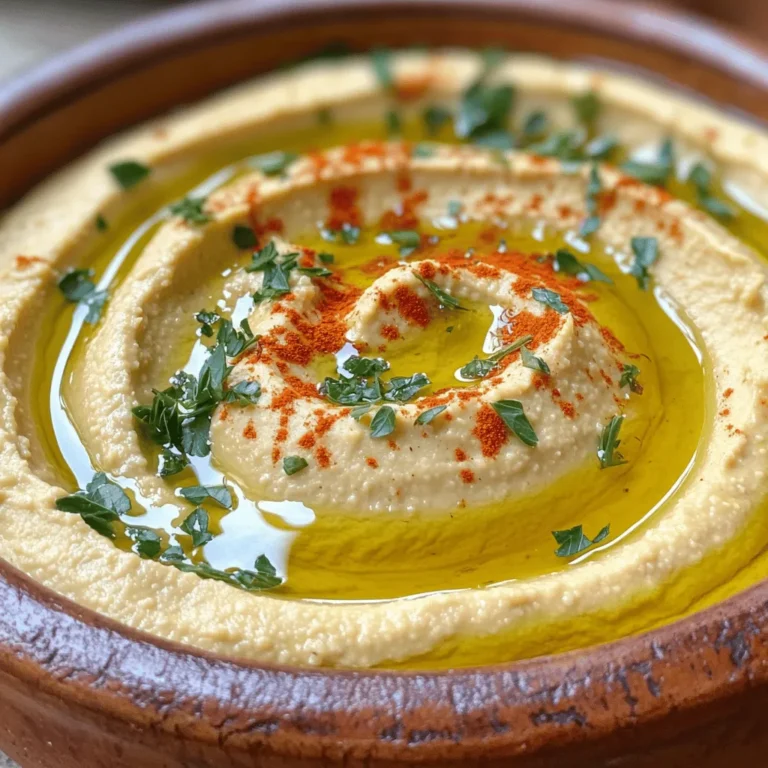
Roasted Red Pepper Hummus Quick and Tasty Recipe
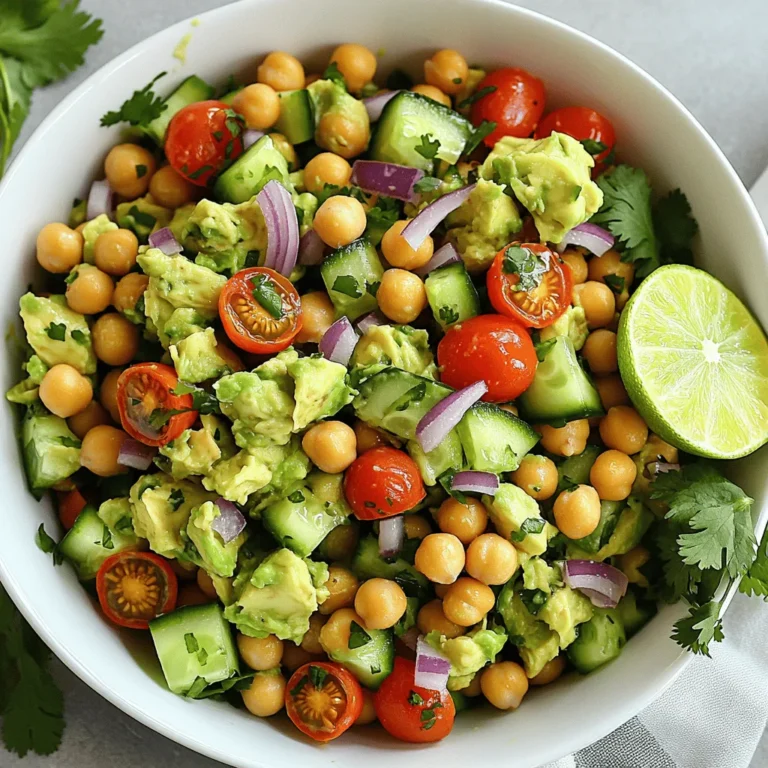
Smashed Avocado Chickpea Salad Fresh and Flavorful
Easy Garlic Parmesan Knots Tasty and Quick Recipe
Pesto Chicken Flatbread Tasty and Easy Recipe
Jalapeño Popper Dip Rich and Creamy Treat
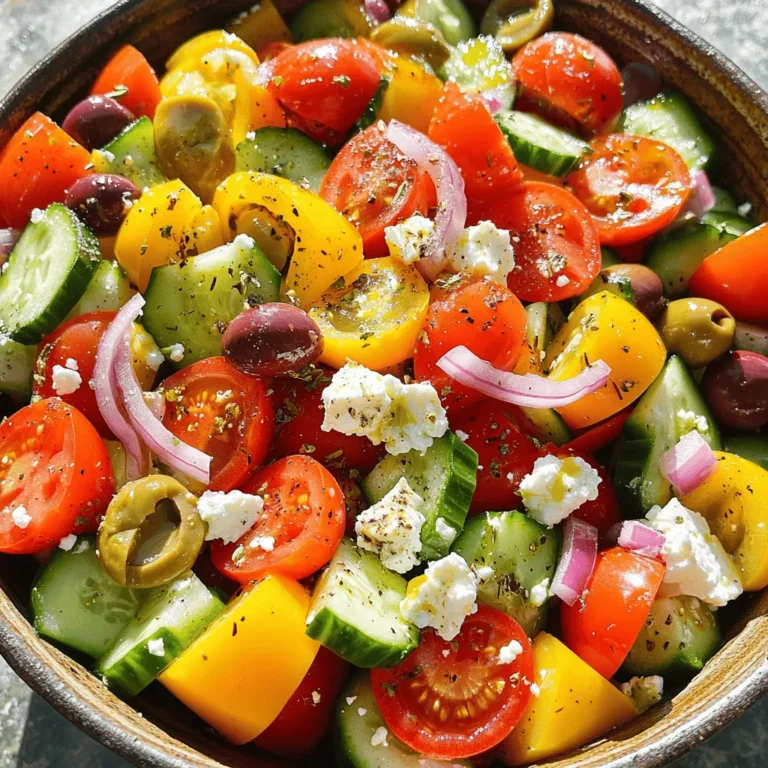
Classic Greek Salad Fresh and Flavorful Recipe
Savory BLT Lettuce Wraps Fresh and Flavorful Meal
Roasted Garlic Hummus Flavorful Dip for Everyone
Crunchy Thai Peanut Salad Fresh and Flavorful Dish
Balsamic Roasted Brussel Sprouts Flavorful Side Dish
Page navigation
Previous Page
Previous
1
2
3
4
Next Page
Next
Home
Dinner
Appetizer
Desserts
Drinks
About
Contact
Privacy Policy
Toggle Menu Close
Search for:
Search


![To make these tasty knots, gather these ingredients: - 1 package (16 oz) refrigerated pizza dough - 4 tablespoons unsalted butter, melted - 3 cloves of garlic, finely minced - 1/2 cup freshly grated Parmesan cheese - 1 teaspoon dried Italian herbs (like oregano, basil, or thyme) - 1/4 teaspoon red pepper flakes (optional, for a little extra heat) - A pinch of salt, to taste - Fresh parsley, chopped, for garnish You can swap store-bought pizza dough for homemade dough if you prefer. Use any cheese you like, such as mozzarella or cheddar, for a different flavor. If you don’t have fresh garlic, garlic powder works too. For the herbs, dried ones are fine. If you want a kick, add more red pepper flakes or crushed black pepper. Fresh parsley adds a nice touch, but you can skip it if you want. Choose pizza dough that is near its expiration date. This helps ensure it’s soft and easy to work with. When picking garlic, look for firm bulbs without any sprouts or soft spots. For Parmesan cheese, choose a block you can grate yourself for the best flavor. If you buy pre-grated cheese, check the packaging for a good date. Fresh parsley should be vibrant and not wilted. These small details make a big difference in taste! Start by preheating your oven to 400°F (200°C). This helps the knots bake evenly. Next, grab a clean surface and lightly sprinkle it with flour. Roll out the pizza dough into a rectangle. Aim for a thickness of about 1/4 inch. This thickness gives the knots a nice, fluffy texture. Once you have your rectangle, cut the dough into strips. Each strip should measure about 1 inch wide and 6 inches long. This size is perfect for knot formation. Now comes the fun part: making the knots! For each strip, twist it gently and tuck one end through the loop. This creates a beautiful knot shape. Place these knots on a baking sheet lined with parchment paper. Make sure to leave space between each knot. This space allows them to rise and bake without sticking together. In a small bowl, combine melted butter, minced garlic, dried Italian herbs, red pepper flakes, and a pinch of salt. Mix this until it's well blended. This garlic butter mixture is key to flavor. Generously brush this mixture over each knot. Make sure every part is coated. This ensures your knots soak up all the deliciousness. After brushing, sprinkle freshly grated Parmesan cheese on top of each knot. This will melt and add a lovely, cheesy crust. Now, place the baking sheet in the oven. Bake for 15-20 minutes or until the knots turn golden brown. Once they’re done, let them cool for a few minutes. Finally, garnish with chopped parsley for that fresh flavor. Enjoy your Easy Garlic Parmesan Knots! For the full recipe, check out the [Full Recipe]. To make soft and fluffy garlic knots, you need to handle the dough gently. When you roll out the pizza dough, keep it about 1/4 inch thick. Cutting strips too thin can lead to crispy knots, which is not what we want. Always twist your knots tightly to ensure they hold their shape during baking. To enhance the flavor, use fresh garlic when making your garlic butter. Freshly minced garlic gives a strong, bold taste that dried garlic cannot match. Also, use high-quality Parmesan cheese for a rich, nutty flavor. If you like a bit of heat, add red pepper flakes. This little kick makes the knots even better. Bake your garlic knots at 400°F (200°C) for the best results. This temperature helps them rise nicely and get golden brown. Keep an eye on them after 15 minutes. Ovens can vary, so check for a golden color. If they need more time, add a few extra minutes. Always let them cool for a couple of minutes before serving. This lets the flavors settle and makes them easier to eat. For the full recipe, check the details above. {{image_4}} You can switch up the cheese in your garlic knots. Mozzarella gives a nice, gooey texture. Cheddar adds a sharp flavor. Feta offers a crumbly, salty kick. Each cheese brings its own twist. Try mixing different cheeses for a fun flavor blend. Want to spice things up? Add herbs like rosemary or thyme to your garlic butter. You can also try spices like paprika or cayenne for heat. Fresh basil adds a bright taste. These small changes create a new taste experience. Experiment with what you love! You can make these knots gluten-free easily. Use gluten-free pizza dough instead of regular dough. For a vegan twist, swap butter for oil and use nutritional yeast in place of cheese. These swaps let everyone enjoy your tasty knots. You can still keep them delicious! Check the Full Recipe for more tips. After you bake your garlic parmesan knots, let them cool down. Place any leftovers in an airtight container. This helps keep them fresh. You can store them at room temperature for up to two days. If you want them to last longer, move them to the fridge. They will stay good for about a week in there. When you are ready to enjoy your leftover knots, reheating them is easy. Preheat your oven to 350°F (175°C). Place the knots on a baking sheet and cover them with foil. This keeps them from drying out. Heat for about 10 minutes or until warm. You can also use a microwave, but they might get a bit chewy. If you have a lot of leftover knots, freezing is a great option. First, let them cool completely. Then, wrap each knot in plastic wrap. Place the wrapped knots in a freezer bag or container. Label the bag with the date. They can stay in the freezer for up to three months. To eat them, thaw in the fridge overnight, then reheat as mentioned above. For the full recipe, check out the details above. Garlic parmesan knots last about 2-3 days at room temperature. Store them in an airtight container to keep them fresh. If you want to extend their life, consider freezing them. They can last up to three months in the freezer. Just make sure to wrap them well to prevent freezer burn. Yes, you can make the dough ahead of time. Just prepare the dough and store it in the fridge for up to 24 hours. When you're ready to bake, let it sit at room temperature for about 30 minutes. This helps it relax and makes it easier to work with. You can serve garlic parmesan knots with marinara sauce for dipping. They also go well with garlic butter or a creamy ranch dressing. Pair them with your favorite pasta dish or a fresh salad for a complete meal. Yes, you can make these knots in advance! Prepare the knots and place them on a baking sheet. Cover them with plastic wrap and refrigerate for up to 2 hours before baking. When you're ready to eat, just take them out, let them sit for a few minutes, then bake as directed. Absolutely! You can use homemade pizza dough for these knots. Just ensure it is well-kneaded and has risen properly. This will give you a nice texture and flavor. You can find the full recipe for garlic parmesan knots using either type of dough. You now have a complete guide for making Easy Garlic Parmesan Knots. We covered the ingredients, step-by-step instructions, and tips for the best results. You learned about variations to suit your taste and how to store any leftovers. With this knowledge, you can create delicious knots each time. Remember, the key is fresh ingredients and proper baking techniques. Enjoy the process and make these knots your own!](https://tastyrecipes.blog/wp-content/uploads/2025/06/4f28ee24-23f7-48a3-a976-812a2e22feda-768x768.webp)


![- 1 lb Brussels sprouts, trimmed and halved - 3 tablespoons balsamic vinegar - 2 tablespoons extra virgin olive oil - 1 tablespoon honey (or maple syrup for a vegan option) - 3 cloves garlic, finely minced - 1/4 cup crushed walnuts (for added texture) - 1/4 cup grated Parmesan cheese (for a savory finish) - Fresh parsley for garnish - Salt and freshly cracked black pepper, to taste I love using fresh Brussels sprouts for this dish. They become sweet and crispy when roasted. For the main ingredients, you need Brussels sprouts, balsamic vinegar, olive oil, and honey. This mix gives depth and sweetness to the sprouts. If you want to enhance the flavor, consider adding garlic. It brings a nice kick. Crushed walnuts add crunch, while Parmesan provides a cheesy layer. Fresh parsley brightens the dish and makes it pretty on the plate. For seasoning, keep it simple. Salt and cracked black pepper bring out the natural taste. This recipe is flexible, so feel free to skip the optional ingredients if you prefer. For the full recipe, check out the detailed instructions. Start by trimming the Brussels sprouts. Cut off the tough ends and remove any yellow leaves. Then, cut each sprout in half. This helps them cook evenly and become crispy. Next, mix the marinade ingredients. In a large bowl, add the halved Brussels sprouts. Pour in 3 tablespoons of balsamic vinegar and 2 tablespoons of extra virgin olive oil. Add 1 tablespoon of honey or maple syrup for sweetness. Finely mince 3 cloves of garlic and add them to the bowl. Season with salt and freshly cracked black pepper. Toss everything together until the sprouts are well-coated. Preheat your oven to 400°F (200°C). This high heat will give your Brussels sprouts a nice caramelization. Prepare a baking sheet by lining it with parchment paper. This makes cleanup easy and helps prevent sticking. Spread the Brussels sprouts on the baking sheet in a single layer. Make sure they are spaced out; this allows hot air to circulate around each sprout for even roasting. Bake the sprouts in the oven for 20-25 minutes. Halfway through, stir the sprouts to ensure they roast evenly. This step is key for achieving that perfect crispy texture. If using crushed walnuts, sprinkle them over the Brussels sprouts during the last 5 minutes of roasting. This adds a delightful crunch. Once the sprouts are golden-brown and crispy, take them out of the oven. Transfer them to a serving dish while warm. If desired, sprinkle 1/4 cup of grated Parmesan cheese over the sprouts for a savory finish. Finally, garnish with finely chopped fresh parsley. This adds a pop of color and freshness. Serve your balsamic roasted Brussels sprouts warm and enjoy! For the full recipe, check out the details above. To get the best texture, spacing is key. Place Brussels sprouts in a single layer on the baking sheet. This allows hot air to flow around each piece, giving you that nice, crispy finish. If they are too close, they will steam instead of roast. Roasting times can vary based on your oven type. Most home ovens work well at 400°F for 20-25 minutes. If your oven runs hot or cold, check your sprouts at the 15-minute mark. Remember, you want a golden-brown color on the outside. Spices and herbs can elevate your dish. Try adding a pinch of red pepper flakes for heat or thyme for a fresh taste. These small additions make a big difference. For balsamic glaze variations, consider mixing in maple syrup or a splash of orange juice. These tweaks add new layers of flavor and keep the dish exciting. To serve beautifully, use a decorative platter. Arrange the Brussels sprouts in a circle, and drizzle with extra balsamic glaze. This will catch the eye and make the dish pop. Garnishes help too. Sprinkle fresh parsley on top for a splash of color. You can also add lemon zest for a bright finish. These little touches make your dish look and taste gourmet. For a full recipe, check out the instructions above. Enjoy your cooking! {{image_4}} For a vegan twist on Balsamic Roasted Brussels Sprouts, swap honey for maple syrup. This keeps the dish sweet without using animal products. You can also use plant-based cheese instead of Parmesan. Look for brands that melt well and add a cheesy flavor. Want to jazz up your Brussels sprouts? Add crispy bacon or dried cranberries for a fun mix of flavors. You can also try using different vinegars, like apple cider or red wine vinegar, for a unique taste. Changing the oil can also make a difference. Try using avocado oil for a rich, buttery flavor. You can cook Brussels sprouts in various ways. Air frying gives them a nice crunch and saves time. Just set the air fryer to 375°F and cook for about 15 minutes. For stovetop sautéing, heat olive oil in a pan. Add the Brussels sprouts and cook for 10-15 minutes until they are tender and golden. Don't forget to check the [Full Recipe] for more details! To keep your Balsamic Roasted Brussel Sprouts fresh, store them in an airtight container. Place them in the fridge right after they cool down. They will stay fresh for about 3 to 5 days. Make sure to check for any signs of spoilage before eating. When you want to enjoy your leftovers, the best method is to use the oven. Preheat your oven to 350°F (175°C). Spread the Brussels sprouts on a baking sheet and bake for about 10 to 15 minutes. This helps them regain their crispiness. You can also use a skillet over medium heat, stirring often until hot. Yes, you can freeze Balsamic Roasted Brussel Sprouts! To freeze, let them cool completely. Then, place them in a freezer-safe bag or container. They can last up to 3 months in the freezer. When ready to eat, thaw them in the fridge overnight. Reheat them in the oven to keep them crispy. Enjoy the delicious flavors even after freezing! To make Balsamic Roasted Brussel Sprouts, you first gather your ingredients. You need Brussels sprouts, balsamic vinegar, olive oil, honey, garlic, salt, and pepper. You can also add walnuts and Parmesan if you like. Start by preheating your oven to 400°F (200°C). Next, trim and halve the Brussels sprouts. In a bowl, mix them with olive oil, balsamic vinegar, honey, minced garlic, salt, and pepper. Make sure each sprout gets coated well. Then, spread them on a baking sheet. Roast for 20-25 minutes, stirring halfway. This helps them cook evenly. If using walnuts, add them five minutes before the end. Once roasted, garnish with Parmesan and parsley. For the full recipe, check the section above. Yes, you can use frozen Brussels sprouts. They save time and are easy to find. However, there are pros and cons. Pros: - Convenient and quick to prepare. - Have a long shelf life. Cons: - May not get as crispy as fresh ones. - Can have a more watery texture after cooking. If using frozen sprouts, make sure to thaw and drain them first. This helps reduce excess moisture. Balsamic Roasted Brussel Sprouts pair well with many dishes. Here are some great options: - Grilled chicken or fish for a healthy meal. - Quinoa or rice for a filling side. - A fresh salad for a light touch. - Pasta dishes for a comforting combo. You can also serve them with roasted meats or as part of a vegetable platter. If you want to make more Balsamic Roasted Brussel Sprouts, it's easy to adjust. Here are some tips: - Simply double or triple the ingredients. - Use multiple baking sheets if needed. - Space the sprouts out well to ensure even roasting. Keep the cooking time the same, but check for doneness. You want them crispy and caramelized. Balsamic roasted Brussels sprouts combine simple ingredients for a tasty dish. We discussed key ingredients and helpful tips for perfect roasting. Remember, spacing and timing matter for crispy results. You can also change flavors or cooking methods for variety. Don't forget to store leftovers properly for later enjoyment. Now it's time to get cooking and enjoy this dish that fits any table! A little effort brings great taste.](https://tastyrecipes.blog/wp-content/uploads/2025/06/c517bbea-4856-4258-a4a1-bd02b0855d9d-768x768.webp)