Skip to content
About
Contact
Cookie Policy
Copyright Policy
Disclaimer
Search
Home
Dinner
Appetizer
Desserts
Drinks
About
Contact
Privacy Policy
Toggle Menu
Home
/
Desserts
Desserts
Lemon Blueberry Yogurt Loaf Perfectly Moist Delight
Lemon Raspberry Muffins Flavorful and Easy Recipe
Mango Coconut Popsicles Refreshing Summer Delight
Raspberry White Chocolate Muffins Simple and Tasty Treat
Chocolate Chip Banana Bread Simple and Tasty Recipe
Pineapple Coconut Chia Pudding Delightful and Easy Recipe
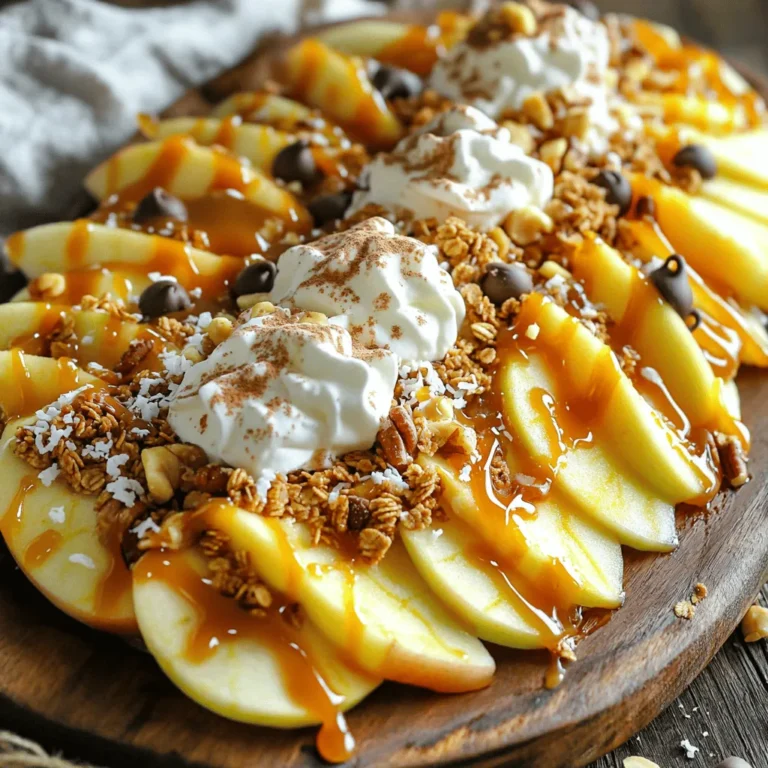
Caramel Apple Nachos Sweet and Simple Dessert Treat
Chocolate Chip Banana Bread Simple and Delicious Recipe
Chewy Oatmeal Raisin Cookies Easy and Delicious Recipe
Lemon Blueberry Pound Cake Delightful Flavor Treat
Page navigation
1
2
3
Next Page
Next
Home
Dinner
Appetizer
Desserts
Drinks
About
Contact
Privacy Policy
Toggle Menu Close
Search for:
Search

![To make a Lemon Blueberry Yogurt Loaf, you need the following ingredients: - 1 cup plain Greek yogurt - 1 cup granulated sugar - 3 large eggs - 1/4 cup vegetable oil - Zest of 1 large lemon - 1/4 cup freshly squeezed lemon juice - 1 teaspoon vanilla extract - 2 cups all-purpose flour - 1 teaspoon baking powder - 1/2 teaspoon baking soda - 1/4 teaspoon salt - 1 1/2 cups fresh blueberries (or frozen, if out of season) - 1 tablespoon all-purpose flour (for tossing the blueberries) These ingredients work together to create a loaf that is moist, flavorful, and packed with zesty lemon and sweet blueberries. The Greek yogurt is key for moisture. It adds a nice tang and keeps the loaf tender. You can use fresh blueberries for a burst of flavor. If they are out of season, frozen blueberries will work too. Just toss them in flour before adding them to the batter. This helps keep them from sinking to the bottom. Zest from the lemon adds a bright flavor. It brings out the lemon juice and makes the loaf shine. Use a microplane or fine grater for the zest. For the sweet base, granulated sugar is perfect. It blends well and allows the lemon flavor to pop. Also, using eggs helps bind the mixture. They add structure and richness. The combination of baking powder and baking soda makes the loaf rise. These ingredients create a light and fluffy texture. The salt balances the sweetness, making each bite perfect. This list of ingredients will set you up for a delicious baking experience. If you're ready to bake, check out the Full Recipe for the steps to follow. - Preheat your oven to 350°F (175°C). - Prepare a 9x5-inch loaf pan by greasing it and dusting it with flour. - Make sure all your ingredients are at room temperature before starting. - In a large bowl, combine 1 cup of Greek yogurt, 1 cup of sugar, and 3 eggs. - Whisk these until the mixture is smooth. - Next, add 1/4 cup of vegetable oil, the zest of 1 lemon, 1/4 cup of lemon juice, and 1 teaspoon of vanilla extract. - Mix well to blend all ingredients together. - In another bowl, whisk together 2 cups of flour, 1 teaspoon of baking powder, 1/2 teaspoon of baking soda, and 1/4 teaspoon of salt. - Gradually add this dry mixture to the wet ingredients. - Stir gently until just combined; avoid overmixing to keep the loaf fluffy. - Take 1 1/2 cups of fresh blueberries and toss them with 1 tablespoon of flour. - This step keeps them from sinking in the loaf. - Gently fold the blueberries into the batter, spreading them evenly. - Pour the batter into your prepared loaf pan and smooth the top. - Bake for 50-60 minutes, checking for doneness with a toothpick. - If it comes out clean, your loaf is ready! - Cool it in the pan for about 10 minutes, then transfer it to a wire rack to cool completely. Enjoy this Lemon Blueberry Yogurt Loaf by following the [Full Recipe]. - Always check for doneness using the toothpick method. Insert a toothpick into the center of your loaf. If it comes out clean, your loaf is done. - If the top starts to brown too quickly, cover it with foil. This helps it bake evenly without burning. - For extra zest, think about adding lemon extract. It boosts the lemon flavor, making each bite pop. - You can also substitute different fruits, like strawberries or raspberries, for a unique twist. Each fruit brings its own taste and color to the loaf. - To enhance visual appeal, slice the loaf and arrange it on a decorative platter. Fresh blueberries and a sprinkle of lemon zest make it look inviting. - Consider serving it with a dollop of whipped cream or a scoop of vanilla ice cream. This adds an extra layer of fun and flavor to your dish. Follow these tips to make your Lemon Blueberry Yogurt Loaf not just delicious but stunning too. For the full recipe, check the [Full Recipe]. {{image_4}} You can make your Lemon Blueberry Yogurt Loaf even more exciting. Try adding almond extract for a nutty flavor that pairs well with blueberries. Just a teaspoon will do wonders. You can also incorporate poppy seeds for a delightful crunch. A tablespoon or two can add texture and a unique twist to every bite. Think about how you want to finish your loaf. You can create a lemon glaze for a sweet tang or use cream cheese frosting for a richer taste. Both options bring out the flavor of the lemon. Fresh fruit and yogurt are great toppings too. They add freshness and color, making your loaf look even more inviting. If you need to make gluten-free adjustments, you can swap all-purpose flour for a gluten-free blend. Just ensure it works for baking. For vegan options, use plant-based yogurt and flax eggs instead of regular eggs. This keeps the loaf moist and delicious while meeting dietary needs. With these variations, you can easily customize the Lemon Blueberry Yogurt Loaf to fit your taste and dietary preferences. Check out the Full Recipe for more details! To store your lemon blueberry yogurt loaf, wrap it tightly in plastic wrap. This step keeps the loaf moist and fresh. You can also place it in an airtight container. If you want to keep it for a longer time, consider freezing it. Slice the loaf first, then wrap each piece separately. This method lets you grab a slice whenever you want! Reheating the loaf is easy. You can use a microwave or an oven. For the microwave, heat a slice for 15-20 seconds. If you prefer the oven, preheat it to 350°F (175°C). Place the slice on a baking sheet and heat it for about 5-10 minutes. You can serve it warm with a pat of butter or a scoop of yogurt. Your lemon blueberry yogurt loaf can last for about 5 days in the fridge. If you freeze it, it can stay fresh for up to 3 months. Always check for signs of spoilage before enjoying it. Look for mold or an off smell. If you see any of these signs, it’s best to toss it. For more details on how to make this delicious loaf, check out the Full Recipe. Can I use frozen blueberries for this recipe? Yes, you can use frozen blueberries! They work well and save time. Just toss them in flour before mixing them into the batter. This helps them stay suspended in the loaf. How can I make the loaf less sweet? To reduce sweetness, cut back on the sugar. You can try using 3/4 cup instead of 1 cup. This keeps the flavor but makes it less sweet. What is the best way to keep the loaf moist? To keep your loaf moist, use Greek yogurt. It adds moisture and keeps the loaf tender. Also, avoid overbaking, as that can dry it out. Can I substitute Greek yogurt with another type? You can substitute regular yogurt for Greek yogurt. Just make sure it is plain and not flavored. The texture will change slightly, but the taste will still be good. Is it necessary to use lemon juice and zest? Yes, both lemon juice and zest are important. They give the loaf its bright flavor. Skipping these ingredients will change the taste and freshness of the loaf. How can I tell if my loaf is fully baked? To check if your loaf is done, use a toothpick. Insert it into the center of the loaf. If it comes out clean, your loaf is ready. If not, bake it a bit longer. What is the role of baking powder and baking soda? Baking powder and baking soda help the loaf rise. Baking powder works with moisture, while baking soda needs acid, like lemon juice. Together, they create a fluffy texture. How to avoid a dense loaf in baking? To avoid a dense loaf, don’t overmix the batter. Mix until just combined. Also, make sure your ingredients are at room temperature for the best results. Why is my loaf rising unevenly? Uneven rising can happen for a few reasons. Your oven might have hot spots, or your batter may not be mixed well. Ensure even mixing and check your oven's temperature for best results. This blog post showed you how to make a delicious blueberry loaf. We went over every ingredient and step, from mixing the wet and dry elements to baking and cooling. You got tips for flavor, storage, and even variations. Baking can be fun and easy if you follow these steps. Enjoy your tasty creation, share it with friends, and try the variations to keep things fresh! Happy baking!](https://tastyrecipes.blog/wp-content/uploads/2025/07/2fc7900b-9923-46e2-bad5-c5db5e0bcd31-768x768.webp)
![To make these tasty muffins, you will need: - 1 ½ cups all-purpose flour - ½ cup granulated sugar - 1 tablespoon baking powder - ½ teaspoon salt - 1 large egg - ½ cup milk (preferably whole) - ⅓ cup vegetable oil - 1 tablespoon lemon zest (approximately from 1 large lemon) - 2 tablespoons freshly squeezed lemon juice - 1 cup fresh raspberries (or thawed frozen raspberries) - 1 teaspoon vanilla extract - Optional: Powdered sugar for dusting If you need alternatives, here are some key substitutes: - Use almond flour instead of all-purpose flour for a gluten-free option. - Swap granulated sugar with coconut sugar for a healthier choice. - Instead of milk, use almond milk or oat milk for a dairy-free option. - For a vegan muffin, replace the egg with a flax egg (1 tablespoon flaxseed meal + 2.5 tablespoons water). Measuring accurately is key to great muffins. Here are my tips: - Use dry measuring cups for flour and sugar. Scoop and level off with a straight edge. - For liquid ingredients, use liquid measuring cups. Pour until it reaches the desired mark. - Always check your baking powder and baking soda for freshness. This ensures your muffins rise well. - Use a kitchen scale for precise measurements, especially when baking regularly. For the full recipe, follow the steps and enjoy your baking journey! Start by preheating your oven to 375°F (190°C). This step is key for even baking. Next, grab a 12-cup muffin pan. You can use paper liners or grease the cups lightly. In a large bowl, mix the dry ingredients. Combine 1 ½ cups of all-purpose flour, ½ cup of sugar, 1 tablespoon of baking powder, and ½ teaspoon of salt. Whisk these together until they are smooth and lump-free. In another bowl, mix the wet ingredients. You’ll need 1 large egg, ½ cup of milk, ⅓ cup of vegetable oil, 1 tablespoon of lemon zest, 2 tablespoons of lemon juice, and 1 teaspoon of vanilla extract. Whisk them until you see a smooth texture. Pour the wet mix into the dry bowl. Stir gently to combine. Stop stirring when you see some lumps; overmixing can make the muffins tough. Now, it’s time to fold in the raspberries. Add 1 cup of fresh raspberries gently to the batter. Use a spatula to keep them whole. This way, they will burst with flavor in the muffins. Scoop the batter into your prepared muffin pan. Fill each cup about ¾ full. This allows enough space for the muffins to rise. Place your muffin pan in the preheated oven. Bake for 18 to 20 minutes. Keep an eye on them during the last few minutes. To check if the muffins are done, insert a toothpick into the center of one muffin. If it comes out clean or with a few crumbs, they are ready. The tops should be golden brown. Once baked, take the muffins out of the oven. Let them cool in the pan for about 5 minutes. After that, transfer them to a wire rack. This cooling step helps keep them moist and fluffy. You can find the full recipe above for more detailed steps and additional tips! To make the best lemon raspberry muffins, follow these simple tips: - Use fresh raspberries. They add great flavor and texture. - Zest your lemon finely. This releases more oils, enhancing the lemon flavor. - Don't overmix the batter. Stir just until combined for light, fluffy muffins. - Fill muffin cups properly. Aim for ¾ full to help them rise nicely. - Cool them well. Let muffins cool on a wire rack for the best texture. Avoid these common errors to ensure your muffins shine: - Skipping the baking powder. It’s crucial for fluffiness. - Using cold ingredients. Bring eggs and milk to room temperature first. - Overloading on raspberries. Too many can make the muffins soggy. - Not checking oven temperature. Use an oven thermometer for accuracy. - Ignoring the toothpick test. A clean toothpick means they're done baking. You can boost the flavor and texture of your muffins: - Add a pinch of cinnamon. It pairs well with lemon and raspberry. - Try almond extract for a nutty twist. Just a drop adds a new layer. - Top with a crumbly streusel. It adds crunch and sweetness to every bite. - Drizzle with lemon glaze. Mix powdered sugar and lemon juice for a sweet touch. - Experiment with yogurt. Substitute some milk with yogurt for added moisture. For the complete recipe, check out the [Full Recipe]. {{image_4}} You can make gluten-free lemon raspberry muffins by swapping all-purpose flour for gluten-free flour. Look for a blend that works well in baking. The texture may differ slightly, but the flavor will still shine. Keep an eye on the baking time. Gluten-free muffins often bake faster, so check them a few minutes early. To create vegan lemon raspberry muffins, replace the egg with a flaxseed egg. Mix one tablespoon of ground flaxseed with three tablespoons of water. Let it sit for five minutes to thicken. Use plant-based milk, like almond or oat milk, in place of dairy milk. This way, you can enjoy these delightful muffins without animal products. You can get creative with add-ins for lemon raspberry muffins. Consider adding a handful of chopped nuts for crunch or chocolate chips for sweetness. If you want extra fruit flavor, try mixing in blueberries or blackberries. You might also add a bit of coconut for a tropical twist. Always remember, balance and texture are key to making these muffins truly special. For the full recipe, visit the link provided. To keep your lemon raspberry muffins fresh, store them in an airtight container. This helps prevent them from drying out. Place a paper towel in the container to absorb excess moisture. This will keep the muffins soft and tasty. Store them at room temperature for up to three days. If you want them to last longer, consider freezing. Freezing is a great option for long-term storage. First, let the muffins cool completely. Wrap each muffin in plastic wrap. Then, place them in a freezer-safe bag or container. Be sure to label the bag with the date. You can freeze them for up to three months. When you're ready to enjoy them, simply thaw them at room temperature. Reheating muffins is easy and quick. For best results, use an oven or toaster oven. Preheat the oven to 350°F (175°C). Place the muffins on a baking sheet. Heat for about 5 to 10 minutes, until warm. If you’re in a hurry, you can use the microwave. Heat each muffin for about 15 to 20 seconds. Enjoy your warm, soft muffins as if they were fresh-baked! To make Lemon Raspberry Muffins from scratch, gather your ingredients first. You need flour, sugar, baking powder, salt, an egg, milk, oil, lemon zest, lemon juice, raspberries, and vanilla. Start by mixing the dry ingredients in one bowl. In another bowl, whisk the wet ingredients until smooth. Combine both mixtures, stirring gently. Fold in the raspberries carefully. Pour the batter into muffin cups and bake at 375°F for 18-20 minutes. The smell will fill your kitchen! Yes, you can use frozen raspberries in this recipe. Just thaw them first and drain any extra liquid. This helps keep your muffins from getting too wet. The flavor will still be bright and fresh, just like with fresh raspberries. You can enjoy the same delicious taste! Lemon Raspberry Muffins pair well with many items. For a light meal, serve them with yogurt and honey. You could also enjoy them with fresh fruit. A cup of tea or coffee makes a perfect match, too. For a fun twist, try adding a dollop of whipped cream on top! You now know how to make delicious Lemon Raspberry Muffins. We covered the key ingredients and how to measure them accurately. I shared step-by-step instructions, tips, and tricks to avoid common mistakes. You learned about variations, including gluten-free and vegan options. Lastly, I provided storage tips and answers to your FAQs. Enjoy baking these muffins and make them your own! Happy baking!](https://tastyrecipes.blog/wp-content/uploads/2025/07/a593fd1a-a242-42ee-b55f-4dbddcb8e293-768x768.webp)


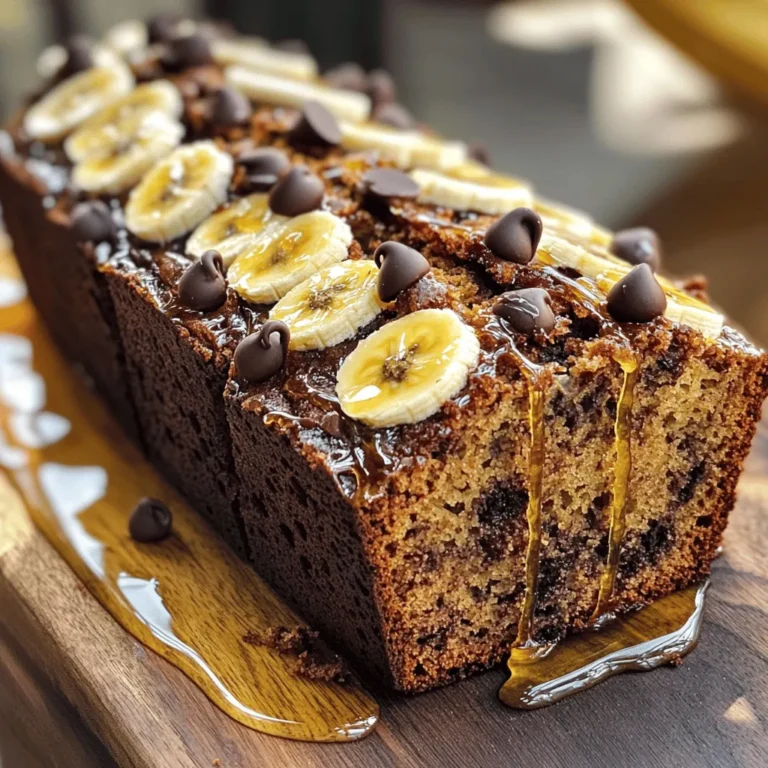
![- 3 ripe bananas, mashed (about 1 1/2 cups) - 1/3 cup coconut oil, melted - 1/2 cup brown sugar, packed - 1 large egg, beaten - 1 teaspoon vanilla extract - 1 teaspoon baking soda - A pinch of salt - 1 1/2 cups all-purpose flour - 1/2 cup chocolate chips (semi-sweet or dark, your choice) The main ingredients create a rich flavor. Ripe bananas give the bread natural sweetness. Coconut oil adds moisture and a slight tropical taste. Brown sugar brings a deep, caramel-like note. The egg binds everything together. Baking soda helps the bread rise. Flour gives a soft texture, while chocolate chips add bursts of sweetness. - 1/4 teaspoon ground cinnamon - Nut butter for serving Adding ground cinnamon enhances the warmth of the bread. It pairs well with bananas. Nut butter on top gives a creamy texture and more flavor. You can use peanut, almond, or cashew butter. - Mixing bowls - Whisk or fork - 9x5-inch loaf pan You will need mixing bowls to combine ingredients. A whisk or fork works great for mixing wet ingredients. A 9x5-inch loaf pan is perfect for baking your banana bread. This size helps the bread cook evenly. For the full recipe, check out the [Full Recipe]. 1. Preheat your oven to 350°F (175°C). 2. Grease a 9x5-inch loaf pan with cooking spray or coconut oil. 3. In a large bowl, mash the ripe bananas until smooth. 4. Add the melted coconut oil to the bananas. Mix well with a fork or whisk. 5. Stir in the packed brown sugar, beaten egg, and vanilla extract. 1. Sprinkle baking soda and a pinch of salt over the mixture. 2. Mix until everything is just combined. Be gentle with the batter. 3. Gradually add the all-purpose flour to the bowl. 4. Use a spatula to fold in the flour until no streaks remain. 1. Carefully fold in the chocolate chips. Ensure they are evenly spread in the batter. 2. Pour the batter into the prepared loaf pan. Smooth the top for even baking. 1. Bake the bread for 55 to 65 minutes. It should turn golden brown. 2. Check doneness by inserting a toothpick into the center. It should come out clean. 3. Once baked, remove the bread from the oven. Let it cool in the pan for 10 minutes. 4. Transfer the bread to a wire rack to cool completely before slicing. Choosing the right bananas Use ripe bananas for the best flavor. Look for bananas with brown spots. The riper they are, the sweeter your bread will be. You can also freeze overripe bananas for later use. This helps avoid waste and ensures you always have ripe bananas on hand. Avoiding overmixing Mix the batter gently. Overmixing can lead to tough banana bread. Stir until the flour disappears but leave some lumps. This keeps the bread light and fluffy. Remember, a little mixing goes a long way in making a perfect loaf. Variations with spices Add spices for extra flavor. Ground cinnamon is a great choice. It adds warmth and richness. You can also try nutmeg or even a hint of cardamom for a unique twist. Just a pinch can elevate the taste. Adjusting sweetness Feel free to adjust the sweetness. If you like your bread less sweet, cut back on the brown sugar. You can also use honey or maple syrup as a substitute. Taste the batter before baking to find the right balance for you. Butter or nut butter toppings Serve slices warm with butter or nut butter. Almond or peanut butter works great. This adds a creamy texture and enhances the flavor. You can also drizzle honey on top for a sweet touch. Garnishing ideas For a fun garnish, add banana slices on top. A sprinkle of cocoa powder or chopped nuts also looks nice. These simple touches make your banana bread look more appetizing. Plus, they add a little extra crunch to each bite. {{image_4}} You can add fun textures to your chocolate chip banana bread. Try mixing in walnuts or pecans for a nice crunch. These nuts boost flavor and add healthy fats. You can also swirl in almond butter for a rich, nutty touch. This twist makes each bite creamy and delicious. If you want a lighter option, use honey instead of sugar. Honey adds sweetness and moisture without refined sugar's drawbacks. Whole wheat flour is another good swap. It adds fiber and nutrients, making your bread more filling. Choosing the right chocolate is key. You can use dark or semi-sweet chocolate chips, depending on your taste. Dark chocolate gives a rich, bold flavor, while semi-sweet is milder. For an extra chocolate kick, add cocoa powder to your batter. This makes your banana bread even more chocolatey and indulgent. For the full recipe, check out the Choco-Banana Bliss Bread. To keep your chocolate chip banana bread fresh, store it at room temperature. Place it in an airtight container or wrap it in plastic wrap. This method keeps the bread moist for about three days. If your kitchen is warm, consider refrigerating it. Wrap it well to prevent it from drying out. The fridge can add a day or two to its life. If you want to save banana bread for later, freezing is a great option. Slice the bread first for easy thawing. Wrap each slice tightly in plastic wrap, then place them in a freezer bag. This method keeps the bread fresh for up to three months. When you crave a slice, remove it from the freezer and let it thaw at room temperature. You can also warm it in the microwave for a few seconds. Yes, you can use frozen bananas. They work great for banana bread. To thaw them, place the frozen bananas in a bowl. Let them sit at room temperature for about 30 minutes. You can also microwave them for about 30 seconds. Once thawed, peel and mash them well. This will give you the right texture for your bread. The moisture from the bananas will help keep your bread moist and tasty. Yes, you can make this recipe vegan. To replace the egg, use 1/4 cup of unsweetened applesauce. This will keep your bread moist. Instead of coconut oil, you can use any plant-based oil. For milk, use almond or soy milk. These simple swaps keep the flavor while making it vegan-friendly. You can check if your banana bread is done with a toothpick. Insert it into the center of the loaf. If it comes out clean or with a few moist crumbs, it’s ready. If it has wet batter on it, bake for a few more minutes. Make sure to keep an eye on it during the last few minutes of baking. This step ensures you avoid dry bread. Enjoy the delicious banana bread! For the full recipe, check out the Choco-Banana Bliss Bread section! You now have all the tools to bake delicious banana bread. We explored key ingredients, like ripe bananas and chocolate chips, and I shared step-by-step instructions for a perfect loaf. You learned helpful tips to enhance flavor and various options for healthier versions. Remember to store your banana bread properly for the best taste. Baking is fun and rewarding, so enjoy your creation! Embrace your inner baker and share your yummy results with friends. Happy baking!](https://tastyrecipes.blog/wp-content/uploads/2025/07/21632505-d8ec-42c0-b6e5-8f54b182a438-768x768.webp)


![Here’s what you need to make Lemon Blueberry Pound Cake: - 1 cup unsalted butter, softened - 2 cups granulated sugar - 4 large eggs - 3 cups all-purpose flour - 1 teaspoon baking powder - 1/2 teaspoon baking soda - 1/2 teaspoon fine sea salt - 1 cup sour cream - Zest of 2 medium lemons - 1/4 cup freshly squeezed lemon juice - 1 1/2 cups fresh blueberries - Optional: Powdered sugar for dusting This list gives you all the flavors and textures you need. The butter adds richness, while the sugar sweetens the cake. Eggs provide structure and moisture. Flour makes it fluffy, and baking powder helps it rise. The sour cream adds tang, and lemon zest and juice brighten every bite. Fresh blueberries bring bursts of flavor. If you want a sweet finish, sprinkle some powdered sugar on top. This cake is simple yet full of joy. Gather these ingredients, and you’re ready to create something delightful. For the full recipe, check out the details in the other sections. - Preheat your oven to 350°F (175°C). - Grease and flour a 10-inch bundt pan or a standard loaf pan. To start, the oven needs to be hot. This step helps the cake rise well. Next, greasing and flouring the pan keeps your cake from sticking. It makes for a clean release when the cake is ready. - In a large bowl, cream the softened butter with the granulated sugar. - Add four large eggs, one at a time, mixing well after each. - Include the lemon zest and juice. Now, combine the butter and sugar with an electric mixer. Beat until it's light and fluffy, about 3 to 5 minutes. Then, add each egg. Mix well so the eggs blend in. The lemon zest and juice add a fresh taste that makes this cake special. - In another bowl, whisk together the flour, baking powder, baking soda, and salt. This step is key. Mixing the dry ingredients helps them combine evenly. It ensures your cake has the right texture. - Gradually add the dry mix to the wet mixture, alternating with the sour cream. - Gently fold in the blueberries. Now, alternate adding the dry mix and sour cream to the butter mix. Start with the flour, then sour cream. Repeat this until you use all the flour. Be careful to mix lightly. Over-mixing can make the cake tough. When you're done, add the blueberries. This adds sweetness and a burst of flavor. - Pour the batter into the prepared pan. Smooth the top with a spatula. - Bake in the oven for 60 to 70 minutes. Finally, pour the batter into the pan. Make sure it's even on top. Bake until a toothpick comes out clean. This shows that the cake is fully baked. After baking, let the cake cool in the pan for about 15 minutes. Then, turn it out onto a wire rack to cool completely. If you want to add a sweet touch, dust with powdered sugar before serving. This recipe will guide you through the process of making Lemon Blueberry Pound Cake, ensuring a delightful treat for all. To get a great cake texture, avoid over-mixing. When you mix the batter, stop as soon as you see no dry flour. Over-mixing makes the cake tough. Use room temperature ingredients for the best results. Cold butter or eggs can lead to uneven mixing. I always take them out ahead of time. To prevent blueberries from sinking, dust them with flour before adding them to the batter. This simple trick helps them stay afloat while baking. When choosing blueberries, opt for fresh ones. Look for firm berries with a deep blue color. Avoid any that are soft or squished. For a lovely presentation, slice the cake and arrange the pieces on a pretty platter. Garnish with fresh blueberries and thin lemon slices. This makes the cake look inviting and fresh. If you have leftovers, store the cake in an airtight container. It keeps well at room temperature for a few days. For longer storage, wrap it and place it in the fridge. {{image_4}} You can change the flavor of your lemon blueberry pound cake in fun ways. Adding poppy seeds gives a nice crunch. Just toss in about two tablespoons before baking. If you want a different taste, swap blueberries for other berries. Raspberries or strawberries work well too. Each berry brings its unique flavor to the cake. You can make this cake fit different diets. For a gluten-free option, use a 1-to-1 gluten-free flour blend. It will keep the texture light. If you need a dairy-free cake, replace sour cream with almond or coconut yogurt. Both options keep the cake moist and tasty. Get creative when serving your pound cake. Pair it with a berry sauce for extra flavor. A drizzle of lemon glaze adds a sweet touch. You can also transform this cake into cupcakes! Just pour the batter into cupcake liners. Bake for about 20-25 minutes. Enjoy these fun variations and make this recipe your own. For the full recipe, click here [Full Recipe]. To keep your Lemon Blueberry Pound Cake fresh, store it in an airtight container. You can store it at room temperature for up to three days. Place it in a cool, dry spot away from sunlight. For longer freshness, refrigerate it. Wrap the cake in plastic wrap or foil before placing it in the fridge. This helps keep moisture in and prevents it from drying out. You can freeze slices of your Lemon Blueberry Pound Cake for later enjoyment. First, let the cake cool completely. Then, slice the cake and wrap each piece in plastic wrap. Place the wrapped slices in a freezer bag. This method keeps them fresh for up to three months. When you're ready to eat, take out a slice and let it thaw at room temperature. For a warm treat, you can reheat it in the microwave for about 15 seconds. Your Lemon Blueberry Pound Cake can last about three days at room temperature. If refrigerated, it can stay fresh for up to a week. Signs of spoilage include a dry texture or mold. If you see any changes, it’s best to toss it out. Always trust your senses when checking if your cake is still good to eat. Can I use frozen blueberries? Yes, you can use frozen blueberries. They work well in this cake. Just remember to rinse them under cold water and dust them lightly with flour. This step helps them not sink in the batter. What can I substitute for sour cream? You can use Greek yogurt or plain yogurt as a substitute for sour cream. Both options provide a similar creaminess and tangy flavor. They help keep the cake moist and delicious. How do I know when the cake is done? To check if your cake is done, insert a toothpick into the center. If it comes out clean or with a few crumbs, your cake is ready. If it has wet batter, bake for a few more minutes and check again. Why did my cake sink? A sinking cake can happen for a few reasons. Overmixing the batter or using too much liquid can cause it to sink. Make sure to mix gently and measure your ingredients correctly. Can I make this cake in advance? Yes, you can bake this cake in advance. It keeps well for a few days at room temperature. Just wrap it tightly in plastic wrap to keep it fresh. What are the best tools for baking? The best tools for baking include a good mixing bowl, measuring cups, and a hand mixer. A reliable bundt pan or loaf pan is also important. These tools help you achieve the best results. For the complete recipe, check out the [Full Recipe]. This blog post outlined a delicious lemon blueberry pound cake recipe. We covered the key ingredients needed, such as butter, sugar, and fresh blueberries. I shared simple steps for preparing, mixing, and baking your cake. Tips helped ensure the best texture and prevent berry sinking. Variations let you play with flavors or accommodate dietary needs. Remember to store it properly to keep it fresh. Enjoy your cake as a tasty treat or at a gathering. With this guide, you can bake a delightful dessert with ease.](https://tastyrecipes.blog/wp-content/uploads/2025/06/262d5a0d-20ef-4415-a970-5d04d21a0ed5-768x768.webp)