Skip to content
About
Contact
Cookie Policy
Copyright Policy
Disclaimer
Search
Home
Dinner
Appetizer
Desserts
Drinks
About
Contact
Privacy Policy
Toggle Menu
Home
/
Desserts
- Page 2
Desserts
Raspberry White Chocolate Muffins Delightful and Easy
Raspberry Almond Thumbprint Cookies Delightfully Simple
Vegan Blueberry Cheesecake Delightful and Simple Dish
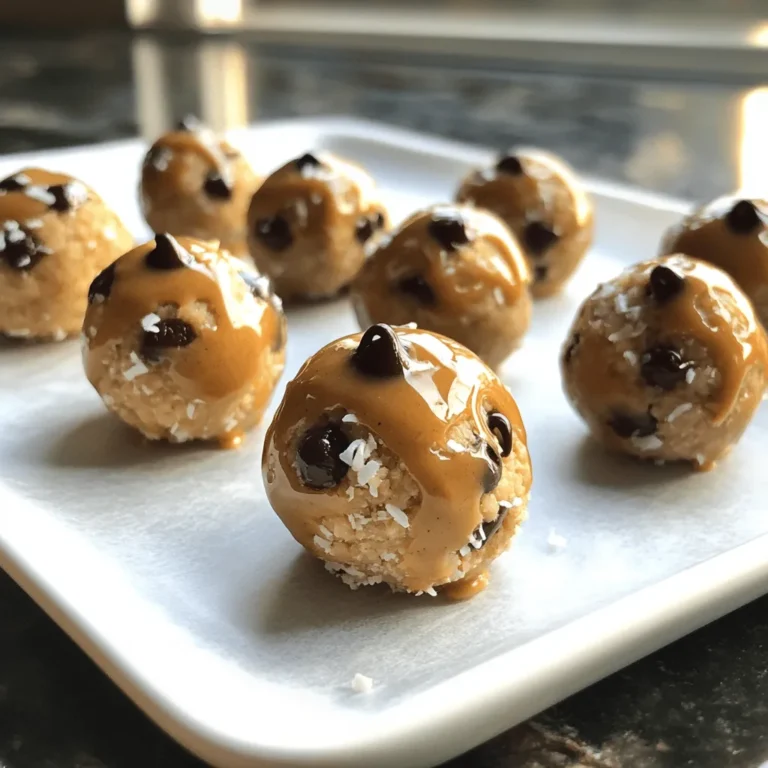
No Bake Cookie Dough Bites Easy and Delicious Treat
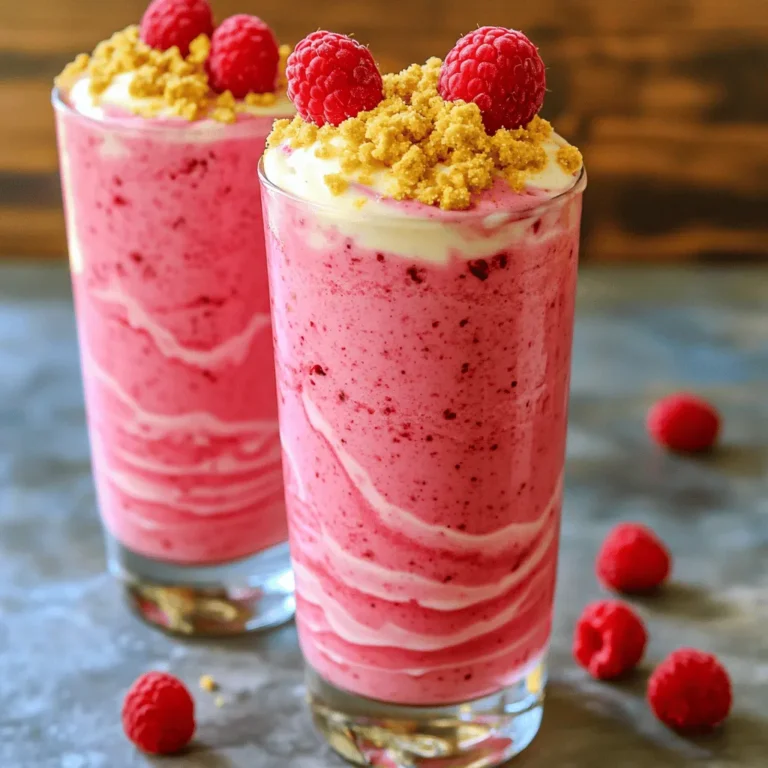
Raspberry Lemon Cheesecake Shake Delicious Dessert Treat
Gingerbread Cookie Butter Shake Creamy Holiday Treat
Strawberry Cheesecake Bites Delightful Easy Treat
Healthy Banana Oat Pancakes Simple and Tasty Recipe
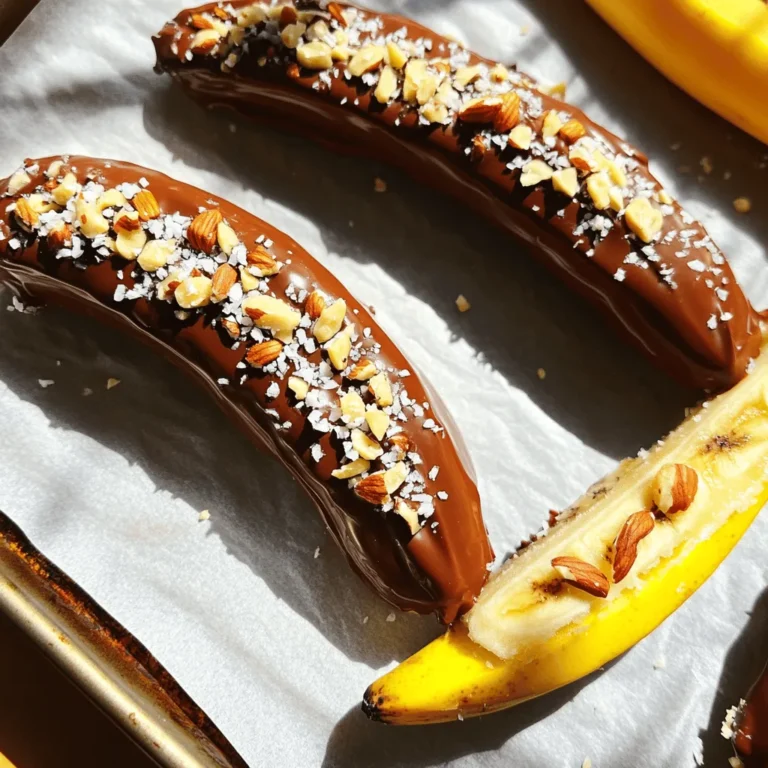
Chocolate Dipped Frozen Bananas Delightful and Easy Treat
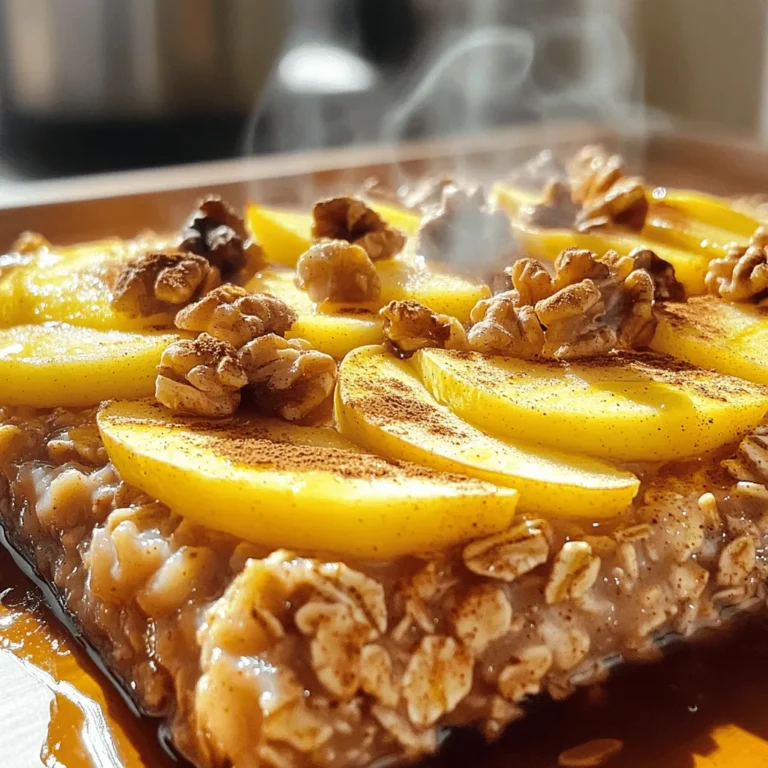
Apple Cinnamon Oatmeal Bake Nourishing and Simple Dish
Page navigation
Previous Page
Previous
1
2
3
Next Page
Next
Home
Dinner
Appetizer
Desserts
Drinks
About
Contact
Privacy Policy
Toggle Menu Close
Search for:
Search

![Here’s what you need to make these tasty raspberry white chocolate muffins: - 1 ½ cups all-purpose flour - ½ cup granulated sugar - ½ cup packed brown sugar - 1 tablespoon baking powder - ½ teaspoon salt - 1 large egg - ¾ cup buttermilk (or use 1 tablespoon of vinegar in regular milk) - ⅓ cup vegetable oil - 1 teaspoon pure vanilla extract - 1 cup fresh raspberries (frozen work too if fresh are not available) - ¾ cup white chocolate chips Each ingredient plays a key role in making these muffins delightful. - All-purpose flour gives structure and helps the muffins rise. - Granulated sugar and brown sugar add sweetness and moisture. - Baking powder is the leavening agent, making the muffins light and fluffy. - Salt enhances flavors and balances sweetness. - Egg binds the ingredients and adds richness. - Buttermilk keeps the muffins tender and moist. - Vegetable oil adds moisture for a soft texture. - Vanilla extract brings warmth and depth to the flavor. - Fresh raspberries add tartness and juicy bursts. - White chocolate chips provide sweet creaminess. For dietary preferences, consider these swaps: - Use whole wheat flour for a nutty flavor. - Substitute coconut oil for vegetable oil for a coconut twist. - Use almond milk or oat milk instead of buttermilk for a dairy-free option. This recipe is versatile, and you can adjust it to fit your needs. For the full recipe, check the section above. 1. Preheat your oven to 375°F (190°C). This warms the oven evenly for baking. 2. Prepare your muffin tin. You can line it with paper liners or use cooking spray. This keeps the muffins from sticking. 3. In a large mixing bowl, combine the all-purpose flour, granulated sugar, packed brown sugar, baking powder, and salt. Whisk these dry ingredients well. This helps mix them evenly. 4. In another bowl, crack the large egg and beat it lightly. Then add the buttermilk, vegetable oil, and vanilla extract. Stir this mixture until it is smooth. 5. Pour this wet mixture into your bowl with the dry ingredients. Using a spatula, stir gently until they just combine. Be careful not to overmix. The batter should look a bit lumpy. 6. Now, fold in the fresh raspberries and white chocolate chips. Do this gently to avoid crushing the raspberries. You want them whole for bursts of flavor! 7. Use a spoon or ice cream scoop to fill each muffin tin cup about two-thirds full. This gives the muffins space to rise. 8. Place the muffin tin in your preheated oven. Bake for 18 to 20 minutes. The muffins should turn a nice golden brown. To check, insert a toothpick in the center. It should come out clean. 9. After baking, take the muffins out of the oven. Let them cool in the tin for about 5 minutes. Then, carefully move them to a wire rack to cool completely. For the full recipe, refer back to the beginning of this article. To make great muffins, do not overmix the batter. Overmixing makes muffins tough and chewy. Mix just until the dry ingredients are moistened. If you see lumps, that's okay! They will bake out. When you fold in the raspberries, do it gently. Use a spatula and lift the batter over the raspberries. This method keeps them intact and prevents mushy spots. If you crush them, the muffins may turn pink and lose their bright flavor. You can add flavors to your muffins. Try adding lemon zest for a fresh twist. Orange zest works well too. If you want more texture, add chopped nuts or oats. To make these muffins dairy-free, use almond or oat milk instead of buttermilk. For a gluten-free option, swap the all-purpose flour for a gluten-free blend. Just ensure it has a good balance of ingredients for best results. For the complete recipe, check the [Full Recipe]. {{image_4}} You can change the flavor of these muffins easily. Swap raspberries for other fruits like blueberries, strawberries, or peaches. Each fruit offers a unique taste and can brighten up your muffins. If you want to try different types of chocolate, use dark or milk chocolate instead of white. You can even mix in nuts or coconut for extra texture. This way, you create your own special muffin that fits your taste. You can make mini muffins or muffin tops with this recipe. For mini muffins, fill the cups about halfway. They will bake faster, so check them around 12 to 15 minutes. If you want to make muffin tops, use a baking sheet instead of a muffin tin. Drop mounds of batter onto the sheet and bake until golden brown. Adjust the baking time to about 15 to 18 minutes. Always check for doneness with a toothpick. These variations let you enjoy raspberry white chocolate muffins in new ways! For the full recipe, refer to the section above. To keep your raspberry white chocolate muffins fresh, store them in an airtight container. This helps lock in moisture and flavor. You can use a plastic or glass container with a tight lid. If you plan to eat the muffins in a few days, leave them at room temperature. For longer storage, place them in the fridge. If you want to store muffins for a longer time, freezing is a great option. First, let the muffins cool completely. Then, wrap each muffin in plastic wrap. Next, place the wrapped muffins in a freezer-safe bag or container. This keeps them fresh for up to three months. When you're ready to enjoy a muffin, simply remove it from the freezer. You can thaw it in the fridge overnight or at room temperature for a few hours. To reheat, pop it in the microwave for about 15-20 seconds. This warms it up and makes it taste fresh again. How do I know when the muffins are done? You can tell the muffins are done when they turn golden brown. Insert a toothpick into the center of one muffin. If it comes out clean, the muffins are ready. This usually takes 18 to 20 minutes at 375°F (190°C). Let them cool a bit before checking. Can I use frozen raspberries instead of fresh? Yes, you can use frozen raspberries in this recipe. They work well if fresh are not available. Just be careful when mixing them in, as they may break apart easily. This can add a nice swirl of color to your muffins. How can I adjust the recipe for fewer servings? To make fewer muffins, simply halve the ingredient amounts. For example, use ¾ cup of flour instead of 1 ½ cups. This will make about 6 muffins. Remember to adjust the baking time as needed. What can I substitute for buttermilk? If you don’t have buttermilk, you can make a quick substitute. Add 1 tablespoon of vinegar to ¾ cup of regular milk. Let it sit for a few minutes until it thickens. This will give you a similar tangy flavor. In this post, we discussed ingredients, clear steps, and handy tips for making muffins. You learned how to mix, bake, and store delicious muffins. Remember, testing the muffins for doneness is key. Use frozen raspberries if fresh ones aren’t available. Always feel free to adjust the recipe to fit your needs. With practice, you’ll achieve perfect muffins. Enjoy the process and your tasty results!](https://tastyrecipes.blog/wp-content/uploads/2025/06/8e0d5649-37a4-45ba-93fd-963f38dc685a-768x768.webp)
![- 1 cup unsalted butter - 1 cup granulated sugar - 1 large egg yolk - 1 teaspoon pure almond extract - 1/2 cup raspberry jam - 1/4 cup sliced almonds - Powdered sugar for dusting - Sea salt for balance When making Raspberry Almond Thumbprint Cookies, you need simple yet rich ingredients. The unsalted butter gives a creamy texture. The granulated sugar adds sweetness. Using one large egg yolk makes the dough rich and smooth. For flavor, pure almond extract brings a nice nutty taste. Raspberry jam is key for the thumbprint filling. It gives a burst of fruity flavor. Sliced almonds add a lovely crunch and look. You can dust the cookies with powdered sugar for a sweet finish. Adding a pinch of sea salt balances the sweetness and enhances flavors. Each ingredient plays a vital role in making these cookies delicious. You can find the Full Recipe for more detailed steps. - Preheat your oven to 350°F (175°C). - Line two baking sheets with parchment paper. Start by mixing the softened butter and sugar. Use an electric mixer on medium speed. Beat until the mix is light and fluffy. This should take about 3-4 minutes. Next, add the egg yolk and almond extract. Mix until everything blends well. In another bowl, whisk the flour and sea salt together. Gradually add this dry mix to the butter mix. Stir gently until it just comes together. Avoid over-mixing to keep the cookies soft. Now, roll the dough into 1-inch balls. Place these on the prepared baking sheets. Make sure to leave about 2 inches between each cookie. Use your thumb or the back of a teaspoon to press down in the center. This creates a small indentation. Spoon about 1/2 teaspoon of raspberry jam into each dip. Be careful not to overfill to stop overflow while baking. Next, sprinkle sliced almonds around the edge of the jam. Press them gently into the dough to help them stick. Bake the cookies in the oven for 12-15 minutes. Look for lightly golden edges. Once done, let them cool for about 5 minutes on the baking sheets. Then, transfer them to a wire rack to cool completely. Optionally, dust the cooled cookies with powdered sugar for a sweet touch. You can find the full recipe [Full Recipe]. The best temperature for baking cookies is 350°F (175°C). This heat cooks the cookies evenly. It helps them rise and brown just right. To achieve the perfect texture, mix the butter and sugar until fluffy. This process adds air to the dough, making your cookies light. Also, avoid over-mixing the dough. Doing so can lead to tough cookies. One common mistake is over-mixing the dough. This adds too much gluten and changes the texture. Another mistake is overfilling with jam. If you add too much jam, it can overflow while baking. Stick to about 1/2 teaspoon for each cookie. This ensures each cookie holds its shape. Pair these cookies with a cup of tea or coffee. The flavors blend well together. You can also serve them on a decorative platter. This makes for an inviting presentation. For fun, try different ways to make them look special. Add a light dusting of powdered sugar for a sweet touch. You might also try using different jams for variety. Explore flavors like strawberry or apricot for a new twist. For the full recipe, check out the link. {{image_4}} Want to spice up your Raspberry Almond Thumbprint Cookies? You can switch the jam! Try strawberry or apricot for a new taste. Each fruit brings its own sweet notes. You can also add citrus zest, like lemon or orange. This gives the cookies a fresh, bright flavor. If you need gluten-free cookies, use almond flour instead of all-purpose flour. This keeps the cookies soft and tasty. For vegan options, swap the butter for coconut oil and use flaxseed mixed with water instead of egg yolk. These changes keep your cookies delicious and friendly for all diets. Do you prefer chewy or crispy cookies? Adjust the baking time. A shorter bake gives you chewy cookies. For a crispy bite, let them bake a bit longer. You can also add more sliced almonds for a delightful crunch. This will make each cookie even more exciting to eat. For the complete recipe, check out the [Full Recipe]. Store your Raspberry Almond Thumbprint Cookies in an airtight container. This keeps them fresh and tasty. Use a container made of glass or plastic with a tight lid. Line the bottom with parchment paper. This will help absorb moisture. Keep the cookies at room temperature. Avoid direct sunlight or heat, which can change their texture. You can freeze these cookies for later enjoyment. To freeze unbaked cookies, shape the dough into balls. Place them on a baking sheet and freeze until solid. Then, transfer them to a freezer bag. For baked cookies, let them cool completely. Place them in an airtight container or freezer bag. To thaw cookies, simply pull them from the freezer and let them sit at room temperature for about 30 minutes. These cookies stay fresh for about one week at room temperature. Look for signs of spoilage. If the cookies become hard or stale, they are past their prime. If you notice any off smells or visible mold, toss them out. For the best taste, enjoy them within a week. You can also freeze them for up to three months. This way, you can savor them later! For the full recipe, check the section above. Raspberry Almond Thumbprint Cookies stay fresh for about one week. Store them in an airtight container at room temperature. If you want them to last longer, keep them in the fridge. They can stay good for two weeks when chilled. Yes, you can use different jams! Try strawberry, apricot, or even blueberry. Each fruit brings its own flavor. Just make sure the jam is thick enough to hold its shape in the cookie. This way, you won't have any overflow during baking. If your cookies spread too much, check your butter. It should be softened, not melted. You could also chill the dough for about 30 minutes before baking. This helps the cookies keep their shape better. You can make these cookies nut-free. Simply skip the sliced almonds. Replace the almond extract with vanilla extract for a different flavor. The cookies will still taste great without nuts. Absolutely! You can freeze the dough for up to three months. Roll the dough into balls and freeze them on a baking sheet. Once frozen, transfer them to a freezer bag. When you're ready to bake, just add a few extra minutes to the baking time. Check the Full Recipe for more details! These Raspberry Almond Thumbprint Cookies are simple and delicious to make. We covered the key ingredients, step-by-step instructions, and some helpful tips along the way. Exploring variations, storage best practices, and common questions helps enhance your baking experience. With this guide, you’ll create tasty cookies that delight everyone. Enjoy the baking process and share these treats with friends and family. Happy baking!](https://tastyrecipes.blog/wp-content/uploads/2025/06/dc1d577c-7c0d-4136-9a4e-aaaba9fd1937-768x768.webp)


![To make Healthy Banana Oat Pancakes, you need the following ingredients: - 1 cup rolled oats - 1 ripe banana, well-mashed - 1 cup almond milk (or your preferred milk) - 1 tablespoon baking powder - 1/2 teaspoon ground cinnamon - 1/4 teaspoon sea salt - 1 tablespoon honey or maple syrup (optional for sweetness) - 1 teaspoon pure vanilla extract - Coconut oil or non-stick cooking spray for greasing These ingredients create a tasty and healthy pancake. The oats give the pancakes a wonderful texture, while the banana adds natural sweetness. Almond milk keeps it light, and a hint of cinnamon brings warmth to each bite. You can swap almond milk for any milk you like, so feel free to make it yours! For the full recipe, check out the detailed steps to create your pancakes. Enjoy making these delicious treats! To start, grab your rolled oats and place them in a blender. Blend on high until they turn into a fine flour. This oat flour will be the main ingredient for your pancakes. It gives them a nice texture and flavor. Next, take a large bowl. Add the oat flour, baking powder, ground cinnamon, and sea salt. Mix them well. Make sure everything is evenly blended. This step is key for a good rise and taste. Now, grab a ripe banana. Mash it in a separate bowl until smooth. Then, pour in the almond milk and add the vanilla extract. If you want a touch of sweetness, add honey or maple syrup. Stir until you have a smooth mixture. Slowly pour your wet mix into the dry mix. Use a spatula to fold it together gently. Don't overmix; a few lumps are fine. This helps keep your pancakes fluffy and light. Heat a non-stick skillet over medium heat. Lightly grease it with coconut oil or non-stick spray. Pour about 1/4 cup of batter for each pancake. Cook until bubbles form on top, about 2-3 minutes. Flip them carefully and cook for another 1-2 minutes. They should be golden brown and cooked through. For the full details, check the Full Recipe. To make your pancakes fluffy, avoid overmixing the batter. When you mix too much, the pancakes can turn out tough. Stir until the wet and dry ingredients just combine. A few lumps are okay! You also want to adjust the cooking temperature. If your skillet is too hot, the pancakes can burn. Keep it on medium heat. This way, they cook evenly and get that nice golden brown color. For an appealing dish, stack the pancakes neatly on a plate. Drizzle honey or maple syrup on top. Add fresh banana slices for extra flavor. A sprinkle of cinnamon makes it look great too. Think about adding a side of creamy Greek yogurt or a mix of colorful berries. This not only enhances the look but also adds taste and nutrition. Use essential utensils for making pancakes. A mixing bowl and a whisk are key. A sturdy spatula helps flip the pancakes easily. I recommend using non-stick cookware. This prevents pancakes from sticking and makes cleanup simple. A good non-stick skillet or griddle works best for cooking these delicious pancakes. For the full recipe, check out the details above! {{image_4}} You can easily modify this recipe to fit your diet. For gluten-free pancakes, use certified gluten-free oats. They work just like regular oats but are safe for those with gluten issues. If you want dairy-free pancakes, swap regular milk for plant-based milk. Almond milk or oat milk are great choices. To make your pancakes even tastier, add chocolate chips or nuts. They give a nice crunch and extra flavor. You can also try infusing spices like nutmeg or vanilla for a flavor boost. These simple changes make each bite exciting. Get creative with how you serve your pancakes! Stack them high and top with a fruit compote. This adds sweetness and color. You can also try savory versions by mixing in herbs or veggies. Adding spinach or chives can give a fun twist to your breakfast. For the [Full Recipe], check out the detailed steps to create these delightful pancakes! You can store leftover pancakes in the fridge. Place them in an airtight container. They will stay fresh for up to three days. If you want to keep them longer, freezing is a great option. Just remember to cool them first before storing. To freeze pancakes, stack them with parchment paper in between. This keeps them from sticking together. Wrap the stack tightly in plastic wrap, then place it in a freezer bag. You can keep them frozen for up to three months. When you’re ready to eat, just pull out as many as you need. To reheat pancakes, you have a few good options. You can use the microwave for quick heating. Just place them on a plate and cover with a damp paper towel. Heat for 20-30 seconds. For a crispier texture, try reheating in a skillet over medium heat. This method helps keep them fluffy and warm. To make Healthy Banana Oat Pancakes, follow these steps: 1. Blend 1 cup of rolled oats into fine flour. 2. In a bowl, mix the oat flour, 1 tablespoon of baking powder, 1/2 teaspoon of ground cinnamon, and 1/4 teaspoon of sea salt. 3. In another bowl, mash 1 ripe banana and mix it with 1 cup of almond milk, 1 tablespoon of honey (optional), and 1 teaspoon of vanilla extract. 4. Combine both mixtures gently without overmixing. 5. Heat a skillet and grease it lightly. 6. Pour 1/4 cup of batter for each pancake. 7. Cook until bubbles form, then flip and brown the other side. You can find the full recipe above. If you need an oat substitute, consider: - Almond flour - Whole wheat flour - Rice flour - Quinoa flour These options can help create a similar texture. Yes, you can use: - Soy milk - Coconut milk - Oat milk - Cow's milk Each milk type brings its flavor, so choose what you like best. Pancakes can last in the fridge for about 3 to 5 days. Store them in an airtight container to keep them fresh. Some tasty topping options include: - Fresh fruits like berries or bananas - Greek yogurt for creaminess - Maple syrup or honey for sweetness - Chopped nuts for crunch Get creative and mix your favorites! These healthy banana oat pancakes are simple and delicious. We blended oats into flour, then combined it with mashed banana, almond milk, and spices to create the batter. Remember to cook them gently to keep them fluffy. You can customize these pancakes with fruits, nuts, or different milks to match your taste. Experiment with various toppings or even savory versions. You can store leftovers in the fridge or freeze them for later. Enjoy making this tasty dish, and share it with friends and family!](https://tastyrecipes.blog/wp-content/uploads/2025/06/4964b642-ac48-454d-a27f-66c43249950b-768x768.webp)