Skip to content
About
Contact
Cookie Policy
Copyright Policy
Disclaimer
Search
Home
Dinner
Appetizer
Desserts
Drinks
About
Contact
Privacy Policy
Toggle Menu
Home
/
Dinner
- Page 5
Dinner
One-Pot Cheesy Taco Pasta Quick And Flavorful Meal
Easy Taco Soup Flavorful and Quick Dinner Recipe
Healthy Chicken Caesar Salad Easy and Tasty Recipe
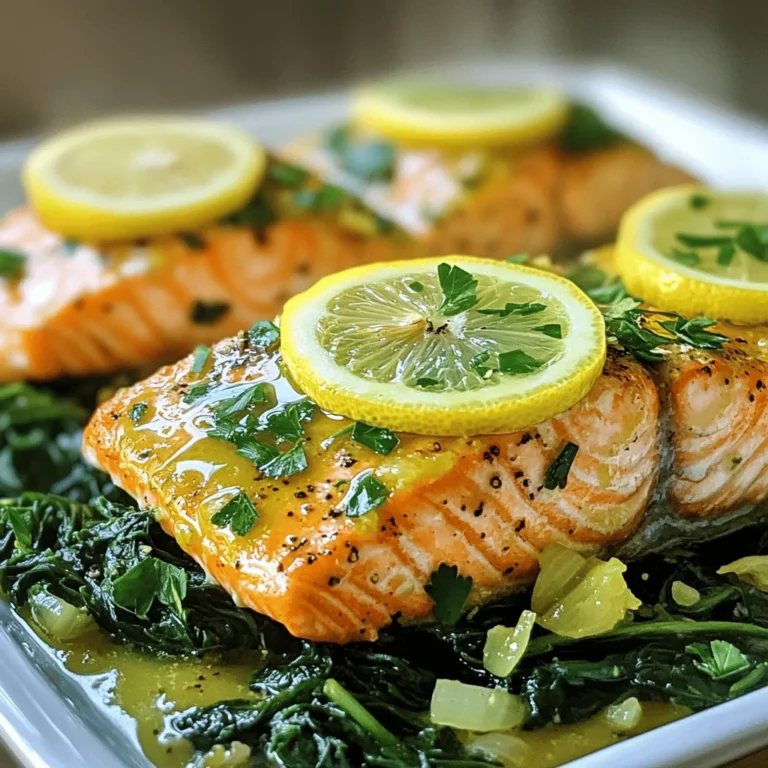
Quick Lemon Garlic Salmon Flavorful and Easy Meal
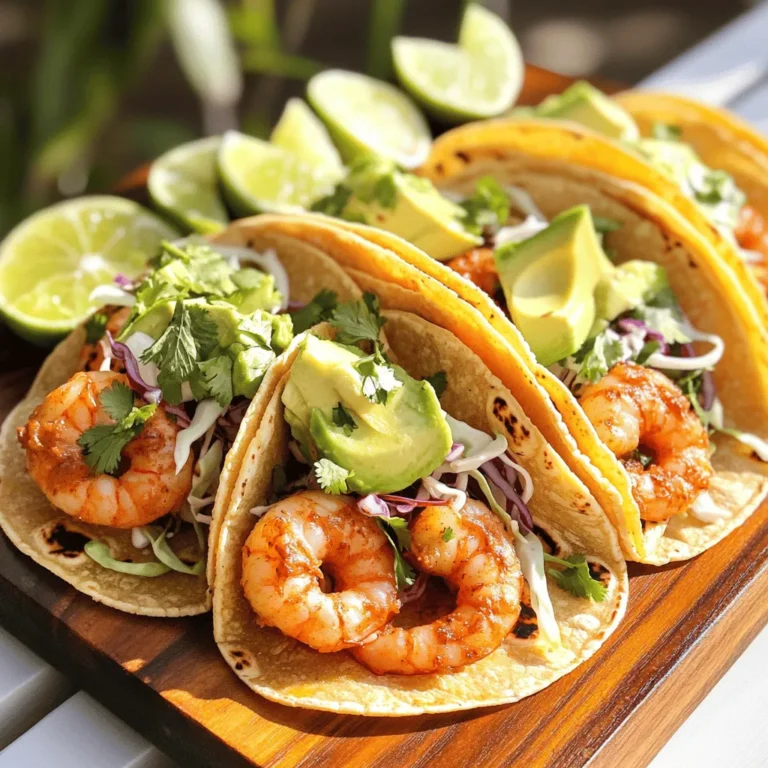
Easy Shrimp Tacos Quick and Flavorful Meal Guide
Chicken Taco Lettuce Wraps Flavorful and Healthy Meal
Roasted Tomato Soup Flavorful and Easy Recipe Guide
Savory Breakfast Burrito Casserole for Easy Mornings
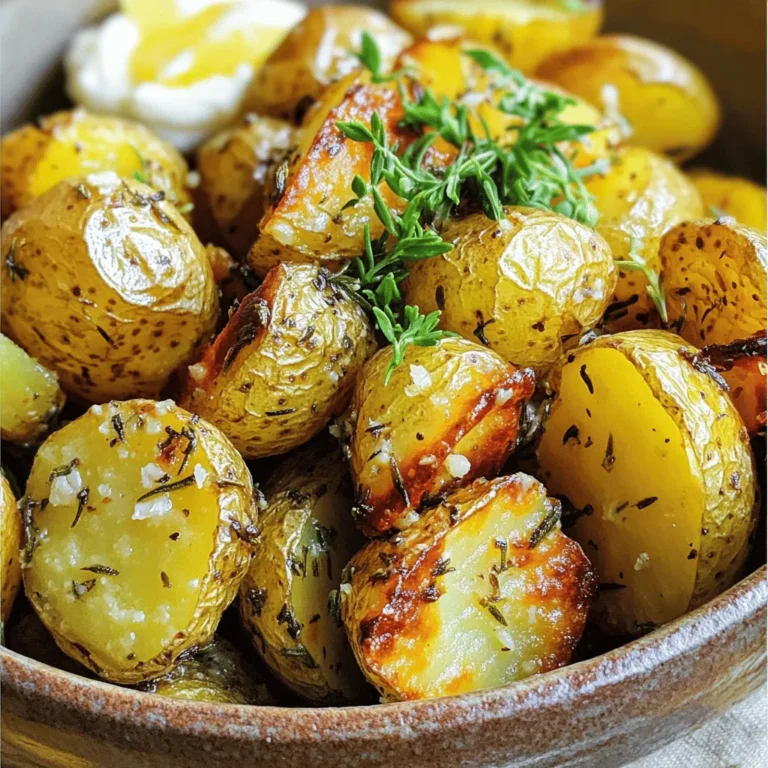
Garlic Herb Roasted Potatoes Flavorful Side Dish
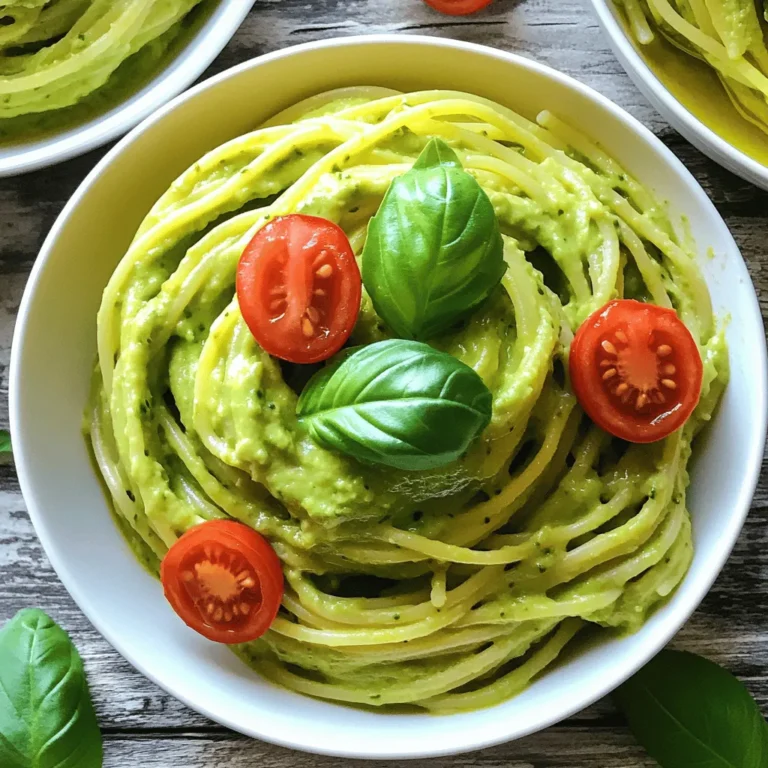
Creamy Avocado Pasta Easy and Delicious Meal Idea
Page navigation
Previous Page
Previous
1
…
3
4
5
6
Next Page
Next
Home
Dinner
Appetizer
Desserts
Drinks
About
Contact
Privacy Policy
Toggle Menu Close
Search for:
Search

![- 1 pound ground beef or turkey - 1 tablespoon olive oil - 1 medium onion, finely diced - 2 cloves garlic, minced - 1 packet taco seasoning (about 1 ounce) - 4 cups vegetable or beef broth - 12 ounces elbow macaroni - 1 can (15 oz) diced tomatoes with green chilies, undrained - 1 cup corn, drained - 2 cups shredded cheddar cheese - Salt and pepper to taste The key to this one-pot cheesy taco pasta lies in its bold flavors. First, I use ground beef or turkey as the base. This choice gives a rich taste and protein boost. Next, onion and garlic add a savory depth. I love how they make the kitchen smell amazing while cooking. Taco seasoning brings that classic Tex-Mex flavor. You can find it in most stores, or you can make your own mix at home. Vegetable or beef broth enhances the dish's richness. It serves as the cooking liquid for the pasta. Elbow macaroni is the perfect shape for this dish. It holds onto the sauce and cheese well. Diced tomatoes add acidity and texture, while corn gives a sweet crunch. Last but not least, cheddar cheese makes everything creamy and delicious. - Fresh cilantro for garnish - Sour cream for serving - Additional spices and toppings I often like to top my pasta with fresh cilantro. It adds a pop of color and flavor. Sour cream is another great option for a creamy finish. You can also customize the dish with your favorite spices or toppings. This way, each bowl can be unique! For the [Full Recipe], check the instructions that guide you through each step. To start, grab a large pot or Dutch oven. Heat 1 tablespoon of olive oil over medium heat. Once it's hot, add 1 medium onion, finely diced, and sauté it for about 3-4 minutes. You want it to be soft and a bit clear. Next, add 2 cloves of minced garlic and stir for about 30 seconds. It should smell great but not burn. Now, add 1 pound of ground beef or turkey. Use a wooden spoon to break it up into small bits. Cook this for 5-7 minutes until it turns brown. Make sure to drain any extra fat to keep it tasty. After cooking the meat, it’s time for the spices. Sprinkle 1 packet of taco seasoning over the meat. Stir well to coat it evenly. Then, carefully pour in 4 cups of vegetable broth or beef broth. Next, add a 15-ounce can of diced tomatoes with green chilies, juices included. Don't forget to add 1 cup of corn too! Turn up the heat until everything boils. Once it boils, add 12 ounces of elbow macaroni. Stir it in and lower the heat to medium-low. Cover the pot and let it simmer for 10-12 minutes. Stir it occasionally to prevent sticking. When the pasta is tender, take the pot off the heat. Stir in 2 cups of shredded cheddar cheese. Mix until it melts and everything is creamy. Taste it and add salt and pepper if needed. This is where the magic happens! For the final touch, serve it hot with fresh cilantro and sour cream on top. For the full recipe, check out the recipe section above. To avoid a greasy texture, drain the fat after cooking the meat. This step keeps your dish light and tasty. Use lean ground turkey instead of beef for an even healthier option. To ensure the pasta doesn’t stick, stir often while it simmers. This helps the noodles cook evenly. You can also add a little oil to the pot before adding the pasta. Garnish your dish with fresh cilantro for a burst of flavor. A dollop of sour cream adds creaminess and balances the spice. Pair your One-Pot Cheesy Taco Pasta with crunchy tortilla chips. They add a nice texture and make the meal more fun. For a fresh touch, serve alongside a simple salad. This balances the richness of the pasta. For the full recipe, check out the One-Pot Cheesy Taco Pasta instructions! {{image_4}} You can easily switch the protein in this dish. If you prefer chicken, use cooked, shredded chicken. This option keeps the meal light and healthy. For a plant-based choice, try using lentils or crumbled tofu. Both options add great texture and flavor. The type of pasta you use can change the dish. While elbow macaroni is classic, you can use penne or fusilli. If you want a gluten-free version, choose gluten-free pasta. Just make sure to cook it according to the package instructions. To boost the flavor, add extra veggies like bell peppers or zucchini. You can also throw in some black beans for added protein. If you like spice, add diced jalapeños or a dash of cayenne pepper. These tweaks make the dish fun and unique. For the full recipe, check the [Full Recipe]. To keep your leftovers fresh, place them in an airtight container. Make sure to cool the pasta to room temperature before sealing. This helps avoid condensation, which can make the pasta soggy. Store it in the fridge for up to three days. This way, you can enjoy the meal again without losing flavor. When you're ready to enjoy your leftovers, reheat them on the stove for the best texture. Add a splash of broth or water to the pot. This keeps the pasta from drying out. Heat it over medium-low heat, stirring often until warmed through. You can also use the microwave. Just cover it with a lid or microwave-safe wrap to keep moisture in. If you want to save some for later, freezing is a great option. Allow the dish to cool completely before portioning it into freezer-safe bags or containers. Remove as much air as possible to prevent freezer burn. You can freeze it for up to three months. When you're ready to eat, let it thaw in the fridge overnight before reheating. This keeps the flavors intact for your next meal. For the full recipe, check the One-Pot Cheesy Taco Pasta link! Yes, you can make this dish ahead of time. Cook the pasta and sauce as usual. Let it cool, then store it in an airtight container. It will stay fresh in the fridge for up to three days. When you're ready to eat, just reheat it on the stove or in the microwave. You may need to add a splash of broth to keep it creamy. To make it milder, use less taco seasoning or choose a mild blend. You can also add more cheese or sour cream to balance the heat. If you want it spicier, add chopped jalapeños or a dash of hot sauce. You can sprinkle some crushed red pepper on top for extra kick! Absolutely! You can try Monterey Jack for a creamy taste. Pepper Jack adds a nice spice. For a sharp flavor, go with extra sharp cheddar. You can even mix different cheeses for more depth. Just make sure to use cheese that melts well for a creamy texture. You have plenty of options! Ground turkey is a lean choice. For a vegetarian option, try black beans or lentils. Chopped mushrooms add a nice texture too. If you like, you can also use shredded chicken or plant-based meat for a tasty twist. This dish combines easy ingredients and simple steps. You start with ground meat, onion, and garlic. Next, add taco seasoning and broth. Don't forget the elbow macaroni and tomatoes for texture. You can tweak it with optional ingredients like cilantro or sour cream. Try different proteins and pasta shapes for variety. Store leftovers correctly, and enjoy them later. This recipe is perfect for meal prep. Use my tips to adjust spice levels and explore cheese options. With these insights, you can create a hearty meal everyone will love.](https://tastyrecipes.blog/wp-content/uploads/2025/06/1c40cc88-153a-4e26-9c1a-169fa3a2ed5d-768x768.webp)

![To make a great Healthy Chicken Caesar Salad, you need fresh and vibrant ingredients. Here’s what to gather: - 2 boneless, skinless chicken breasts - 1 tablespoon extra-virgin olive oil - Sea salt and freshly cracked black pepper, to taste - 6 cups fresh romaine lettuce, thoroughly chopped - 1 cup juicy cherry tomatoes, halved - 1/4 cup finely grated Parmesan cheese (or nutritional yeast for a vegan twist) - 1/4 cup whole grain croutons (store-bought or homemade for added crunch) These fresh ingredients provide flavor and nutrition. Fresh romaine adds crunch, while juicy tomatoes bring sweetness. Chicken is a great source of lean protein. It helps build muscle and keeps you feeling full. If you want other options, consider these: - Grilled shrimp for a seafood twist - Sliced turkey for a lighter choice - Tofu for a plant-based protein These lean proteins keep the salad healthy and delicious. They add variety if you want to switch things up. The dressing makes or breaks the salad. For a healthy twist, I use Greek yogurt. It’s creamy and tangy. Gather these ingredients for the dressing: - 1/4 cup plain Greek yogurt - 2 tablespoons freshly squeezed lemon juice - 1 tablespoon Dijon mustard - 1 clove garlic, finely minced If you want a lighter option, skip the cheese. You can use nutritional yeast instead. This will keep the flavor while making it vegan. For the Full Recipe, remember to follow the steps for a tasty meal. Enjoy making your Healthy Chicken Caesar Salad! To start, preheat your grill or grill pan over medium-high heat. This step is key for juicy chicken. Next, take your two boneless, skinless chicken breasts and coat them lightly with extra-virgin olive oil. Season both sides with sea salt and freshly cracked black pepper. Grill the chicken for about 6-7 minutes on each side. You want the chicken to reach an internal temperature of 165°F (75°C). Once done, let the chicken rest for about 5 minutes. Then slice it into thin strips for easy serving. In a large mixing bowl, combine 6 cups of chopped romaine lettuce and 1 cup of halved cherry tomatoes. This mix creates a fresh and colorful base for your salad. The crisp romaine and juicy tomatoes add both crunch and flavor. Toss them together gently to spread the ingredients evenly. For the dressing, grab a small bowl. Whisk together 1/4 cup of plain Greek yogurt, 2 tablespoons of freshly squeezed lemon juice, 1 tablespoon of Dijon mustard, and 1 clove of finely minced garlic. This mix will give your dressing that creamy texture and zesty flavor. Season with salt and pepper to taste. Make sure it is smooth and creamy. Drizzle the dressing over your salad base and toss gently until everything is well coated. Now, your Healthy Chicken Caesar Salad is almost ready to serve. Place those sliced grilled chicken strips on top, add 1/4 cup of finely grated Parmesan cheese, and sprinkle with 1/4 cup of crunchy whole grain croutons. Finally, garnish with chopped fresh parsley for a pop of color and taste. Enjoy your meal! For the complete recipe, check out the [Full Recipe]. To keep your chicken juicy, start with good quality meat. I recommend using boneless, skinless chicken breasts. Seal in moisture by using a grill or grill pan. Coat the chicken with olive oil and season it well. Grill each side for about 6-7 minutes. Check that the internal temperature hits 165°F (75°C). Let the chicken rest for five minutes before slicing. This helps keep the juices locked inside. When it’s time to toss, be gentle. You want to coat the greens without bruising them. Start by placing the chopped romaine and cherry tomatoes in a large bowl. Drizzle the dressing over the top. Use your hands or salad tongs to mix. Toss lightly until the lettuce is evenly coated. This makes every bite flavorful without overdoing it. Croutons add a delightful crunch to your salad. You can use store-bought whole grain croutons for ease. If you prefer homemade, cube stale bread and toss it with olive oil and seasoning. Bake until golden and crisp. For a twist, try using garlic-flavored croutons. They pair well with the Caesar dressing. Either way, don't skip the croutons; they make the salad exciting! For the full recipe, check out the [Full Recipe]. {{image_4}} If you want a vegetarian twist, swap out the chicken for chickpeas or grilled tofu. Chickpeas add protein and fiber. Tofu offers a nice texture. You can season them with the same spices as the chicken. For an extra punch, add roasted veggies like zucchini or bell peppers. This keeps the salad hearty and satisfying without meat. For a gluten-free option, choose gluten-free croutons or skip them altogether. Use a gluten-free dressing to avoid any gluten. Many brands offer gluten-free Caesar dressings, or you can make your own. Just mix Greek yogurt, lemon juice, and garlic for a creamy base without gluten. This ensures everyone can enjoy the salad. When looking to cut calories, use yogurt-based dressings instead of heavy creams. Greek yogurt is a great base. It adds creaminess without the extra fat. You can also mix in some vinegar or lemon juice for tang. For a zesty kick, add herbs like dill or basil. This keeps the flavor strong while keeping calories low. Explore these variations to find what suits your taste best. For the full recipe, check the link to enjoy a delicious meal! You can store leftover salad in an airtight container. Make sure to keep the dressing separate. This keeps the lettuce fresh and crisp. The salad will stay good for about two days in the fridge. If you add the dressing, it may get soggy. Always check for any signs of spoilage before eating. When you store grilled chicken, place it in a container with a lid. To reheat, use a microwave or a skillet. Heat it until it reaches 165°F (75°C). This ensures it is safe to eat. Do not overcook the chicken, as it can dry out. Adding a splash of water can help keep it moist. For meal prep, slice the chicken and store it in separate containers. Pre-chop lettuce and tomatoes and keep them in the fridge. This saves time during busy days. Make the dressing ahead of time and store it in a jar. This way, your Healthy Chicken Caesar Salad is ready to enjoy any time. Check the [Full Recipe] for more details on making this tasty dish! A Healthy Chicken Caesar Salad has about 350-400 calories per serving. This can vary based on the dressing and toppings you choose. Using Greek yogurt instead of mayo helps cut calories. This salad is filling but light, making it a great choice for lunch or dinner. Yes, you can use different greens! While romaine is classic, you can try spinach, kale, or mixed greens. Each green brings its own flavor and texture. Use what you enjoy or what you have on hand. Mixing greens can also add color and nutrients. You can easily make this salad vegan. Substitute chicken with grilled tofu or chickpeas for protein. Use nutritional yeast in place of Parmesan cheese. For dressing, swap Greek yogurt for a vegan option like cashew cream or a tahini-based dressing. These changes keep the salad tasty and healthy. For the full recipe, check out the detailed list of ingredients and instructions. This blog post covered everything you need for a Healthy Chicken Caesar Salad. We explored fresh ingredients, lean proteins, and lighter dressings. I shared step-by-step instructions to prepare the chicken and mix the salad. Tips helped ensure juicy chicken, the perfect toss, and crunchy croutons. Also, we looked at variations, storage tips, and answered common questions. Now, you can enjoy this salad with confidence and creativity!](https://tastyrecipes.blog/wp-content/uploads/2025/06/52e81a56-9cad-4f56-bd71-d1b25cf19d95-768x768.webp)

![- 2 lbs ripe cherry tomatoes, halved - 1 medium onion, quartered - 4 cloves garlic, peeled and left whole - 3 tablespoons extra virgin olive oil - Salt and freshly ground black pepper - 1 teaspoon balsamic vinegar - 1/4 teaspoon red pepper flakes (optional) - 2 cups vegetable broth - 1/2 cup fresh basil leaves - Extra fresh basil for garnish Gathering the right ingredients is key for a great roasted tomato soup. The cherry tomatoes give a sweet taste. The onion and garlic add depth. Olive oil helps everything roast well. You can use salt and pepper to enhance the flavors. Balsamic vinegar adds a nice tang. If you like spice, try the red pepper flakes. For the broth, you can use homemade or store-bought vegetable broth. Fresh basil gives the soup a bright finish. Save some basil for garnish to make it look nice. Check out the Full Recipe for more details on making this delicious soup! - Preheat your oven to 400°F (200°C). - Spread tomatoes, onion, and garlic on a baking sheet. - Drizzle olive oil and season with salt and pepper. Start by gathering the ingredients. The fresh tomatoes, onion, and garlic create the base. Place them on a baking sheet. This is where the magic begins. Coating them in olive oil helps with roasting. Salt and pepper add essential flavor. Don’t be shy; ensure everything is well coated. - Roast for 25-30 minutes until blistered and caramelized. - Remove from oven and cool slightly. Place the baking sheet in the preheated oven. The heat transforms the vegetables. They will become blistered and sweet. This process caramelizes the natural sugars, enhancing their flavor. Once roasted, let them cool for a few minutes. This makes it easier to handle them later. - Combine roasted vegetables and broth in a pot. - Add chopped basil and balsamic vinegar. - Simmer for an additional 10 minutes, then puree. In a large pot, mix the roasted vegetables with the broth. The broth adds depth to the soup. Next, toss in the chopped basil and balsamic vinegar. These ingredients brighten the flavors. Let it simmer for ten minutes. This step helps the flavors mix well. Finally, use an immersion blender to puree the soup. If you want some texture, leave some chunks. Enjoy the rich, warm aroma filling your kitchen. For the full recipe, check the section above. To get the best flavor, use ripe tomatoes. I love cherry tomatoes. They become sweet and juicy when roasted. Cut them in half so they caramelize well. For perfect caramelization, spread the tomatoes, onion, and garlic in one layer. Make sure they aren't crowded. This helps them roast evenly. Drizzle with olive oil and season well. The oil helps with browning and flavor. You can use either an immersion blender or a standard blender. An immersion blender is easier. You can blend the soup right in the pot. It also saves you from transferring hot soup. Just be careful not to splash. If you use a standard blender, work in batches. Let steam escape by leaving the lid slightly open. This avoids pressure build-up. Blend until smooth or leave some chunks for texture. Roasted tomato soup pairs well with many sides. I recommend crusty bread or a grilled cheese sandwich. They add a nice crunch and make the meal filling. For presentation, ladle the soup into warm bowls. Drizzle a little olive oil on top. Garnish with fresh basil leaves for a splash of color. This makes the dish look appealing, too. You can find the complete recipe [Full Recipe]. {{image_4}} You can make your roasted tomato soup even better with simple add-ins. Try mixing in fresh herbs like thyme or oregano. They bring great flavor and aroma. If you want a kick, add a pinch of smoked paprika or cumin. For a creamy soup, stir in some heavy cream or coconut milk. This will give it a rich texture. If you prefer protein, add cooked beans or shredded chicken. These options will make your soup heartier and more filling. Homemade croutons add a nice crunch to your soup. To make them, cube some bread and toss it with olive oil and seasonings. Bake them until golden and crispy. You can also try different garnishes. Instead of just basil, use a dollop of sour cream or a sprinkle of cheese. Toasted pine nuts or sunflower seeds add a fun crunch, too. Experiment with what you enjoy! This roasted tomato soup can fit many diets. It is naturally vegan and gluten-free. Just check the labels on your broth and seasonings. If you want it dairy-free, use almond milk or oat milk instead of cream. These swaps keep your soup creamy without dairy. You can enjoy the same delicious taste while meeting your dietary needs. For the full recipe, check out Roasted Tomato Basil Bliss. To keep your roasted tomato soup fresh, place it in an airtight container. Use glass or plastic containers that seal tightly. Always let the soup cool before sealing. This helps to prevent condensation, which can make the soup watery. Store it in the fridge for up to five days. Freezing roasted tomato soup is simple. First, let it cool completely. Then, transfer the soup into freezer-safe bags or containers. Remove as much air as possible to prevent freezer burn. You can freeze it for up to three months. When you're ready to eat, thaw it in the fridge overnight. For quick thawing, you can use a microwave or place it in a bowl of cold water. Reheat in a pot over medium heat until hot. Roasted tomato soup lasts about five days in the fridge. In the freezer, it stays good for three months. Always check for signs of spoilage before eating. If it smells off or has an unusual color, it's best to discard it. Enjoy your delicious soup at its best! You can use water, chicken broth, or beef broth. Each has a unique taste. Water works in a pinch, but lacks flavor. Chicken broth adds a rich, savory note, while beef broth gives depth. You might also try mushroom broth for a hearty, earthy taste. Just adjust your seasonings to match the broth you choose. Yes, you can! Canned tomatoes save time and often cost less. They provide a different texture and taste, though. Fresh tomatoes have a bright, juicy flavor, while canned ones are more concentrated. If you use canned tomatoes, look for whole or diced ones in juice or puree. This helps maintain some freshness. To make your soup creamier, add heavy cream or coconut milk. Start with a small amount, about 1/4 cup, and stir it in after blending. You can also use sour cream or Greek yogurt for a tangy twist. If you want a thicker soup, add a little cornstarch mixed with water. This thickens without changing the taste. Roasted tomato soup is easy and fun to make. This guide shared the main ingredients, steps, tips, and variations. You learned how to roast tomatoes, blend them, and serve a tasty dish. Remember, use fresh ingredients for the best flavor. Don’t be afraid to add your twist or flavors. Enjoy your cooking and share this soup with friends and family. Happy cooking!](https://tastyrecipes.blog/wp-content/uploads/2025/06/f1f0485f-a6cb-4c06-9d02-d8f67f9271b2-768x768.webp)