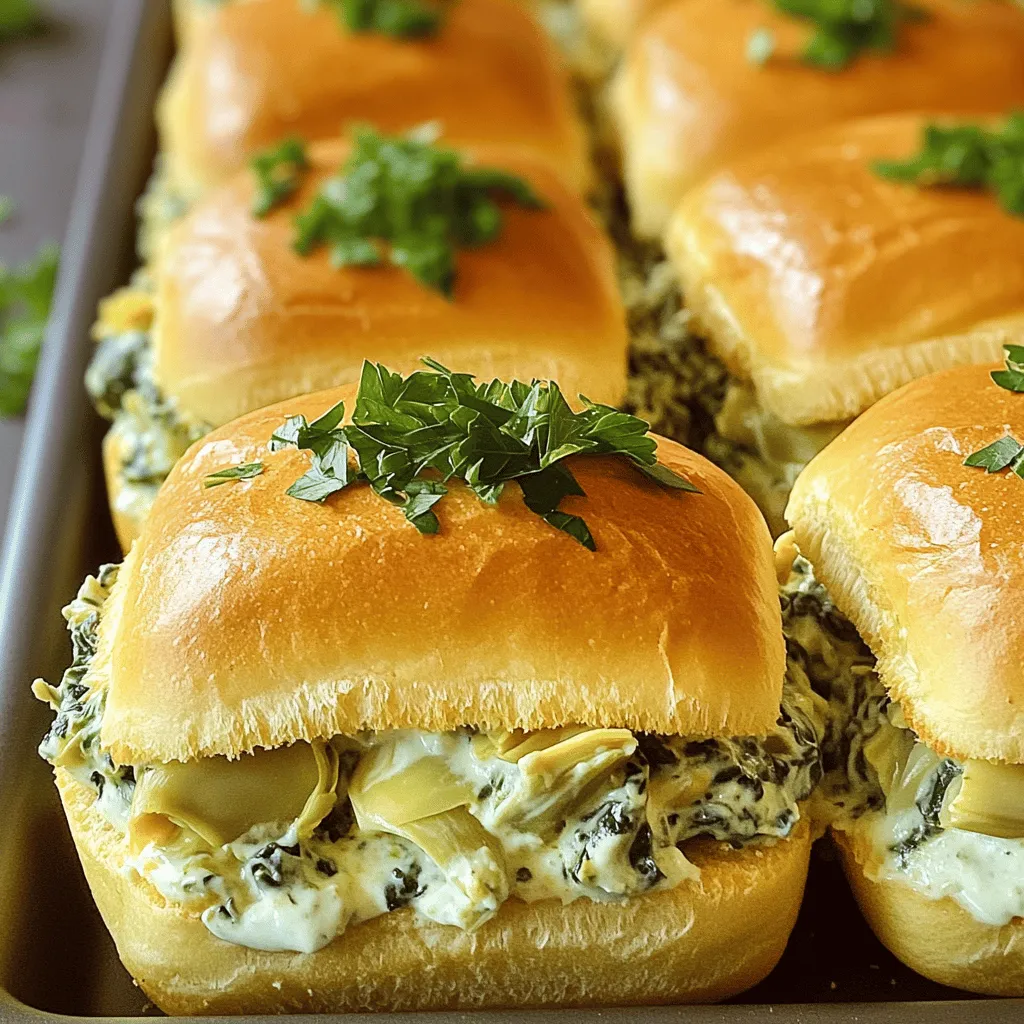
Spinach Artichoke Dip Sliders Tasty and Fun Snack

Get ready for a snack that’s both tasty and fun! Spinach Artichoke Dip Sliders are the perfect blend of creamy flavors and crispy buns. Whether you’re hosting a party or just craving a casual treat, this recipe satisfies everyone. I’ll guide you through simple steps and swap suggestions to meet any dietary needs. So grab your ingredients and tools, and let’s whip up these delicious sliders together!
Ingredients
Required Ingredients
To make Spinach Artichoke Dip Sliders, gather these main ingredients:
– 1 cup cooked spinach, squeezed dry and chopped
– 1 cup canned artichoke hearts, drained and chopped
– 1 cup cream cheese, softened
– 1 cup sour cream
– 1 cup shredded mozzarella cheese
– 1/2 cup grated Parmesan cheese
– 1 teaspoon garlic powder
– 1 teaspoon onion powder
– Salt and black pepper, to taste
– 12 slider buns
– Fresh parsley, chopped, for garnish
These ingredients blend to create a creamy dip that fills the sliders with flavor.
Substitutions
If you have dietary needs, here are some swaps you can use:
– Use Greek yogurt instead of sour cream for a tangy taste.
– Substitute low-fat cream cheese for a lighter option.
– For vegan sliders, try plant-based cream cheese and vegan mozzarella.
– You can swap the buns for lettuce wraps if you want a low-carb choice.
These options help everyone enjoy the dish without worry.
Tools Needed
For this recipe, you will need these kitchen tools:
– A large mixing bowl for combining ingredients
– A spatula for mixing
– A baking dish to hold the sliders
– Aluminum foil to cover the dish while baking
– A knife for slicing the slider buns
Having these tools ready makes your cooking process smooth and easy.
Step-by-Step Instructions
Preparation Steps
To make these Spinach Artichoke Dip Sliders, start by cooking the spinach. If you use fresh spinach, wash it well and sauté it in a pan until wilted. This takes about 3-5 minutes. Once cooked, squeeze out any extra water so your dip stays creamy. Next, prepare the artichokes. Use canned artichoke hearts for ease. Drain them well and chop them roughly.
Now, in a mixing bowl, combine the cooked spinach and chopped artichokes. Add the softened cream cheese and sour cream. Next, sprinkle in the shredded mozzarella, grated Parmesan, garlic powder, onion powder, and a pinch of salt and pepper. Mix everything together until it becomes a smooth, creamy dip. This step is key for a rich flavor.
Assembling the Sliders
Now that your dip is ready, it’s time to assemble the sliders. Carefully slice the slider buns in half horizontally. Place the bottom halves in a large baking dish, fitting them snugly together.
Spread the creamy spinach artichoke mixture evenly over the bottom halves of the buns. Make sure to cover every bit for even taste. This is the fun part!
Once you have the dip on the buns, place the top halves over the filling. Gently press down so they stick. This helps keep everything inside while baking.
Baking Process
Preheat your oven to 350°F (175°C). This step is important for even baking. Once preheated, cover the baking dish tightly with aluminum foil. Bake for 15 minutes to steam the sliders.
After 15 minutes, carefully take off the foil. This allows the tops to crisp up. Bake for another 10-15 minutes until the tops are golden brown and crispy.
To get those perfect crispy tops, brush the tops with a little olive oil before baking. This gives your sliders a tasty finish. Once they are done, let them cool for about 5 minutes before serving. Enjoy your Spinach Artichoke Dip Sliders warm and garnished with fresh parsley for that pop of color. For the full recipe, check out the details above!
Tips & Tricks
Perfecting Texture and Flavor
To make a creamier dip, use room-temperature cream cheese. This helps it blend well. Mixing the ingredients slowly will also help. If you want a richer flavor, add more Parmesan cheese. For personal taste, adjust the garlic and onion powder. Taste as you mix, and add salt and pepper as needed.
Serving Tips
Serve these sliders warm for the best flavor. You can place them on a large platter. Pair them with a bowl of marinara sauce for dipping. A side of crunchy veggies complements the richness too. For drinks, light beers or a crisp white wine work great.
Enhancing Presentation
Garnishing adds a nice touch. Sprinkle finely chopped fresh parsley on top for color. You can also add red pepper flakes for a hint of heat. For parties, arrange sliders in a fun pattern. Use colorful plates or platters to catch the eye.
If you’re ready to try these fun sliders, check out the Full Recipe for detailed steps!
Variations
Flavor Variations
You can change up the flavor of your sliders in many fun ways. Try adding different cheeses like cheddar or gouda for a unique taste. You might also sprinkle in spices like cayenne for some heat or Italian seasoning for added depth. If you want to make it heartier, consider adding cooked chicken or crumbled bacon. You can even toss in more veggies, like diced bell peppers or mushrooms, to boost the nutrition and flavor of your sliders.
Dietary Modifications
If you’re looking for gluten-free options, use gluten-free slider buns. They taste great and keep the sliders fun. For vegan adaptations, swap the cream cheese and sour cream with plant-based versions. Nutritional yeast can give you that cheesy flavor without dairy. You can also use vegan mozzarella cheese to keep it creamy and delicious.
Serving Style Options
You can serve your sliders in different ways, too. If you want a fun twist, make a dip platter instead. Just place the spinach artichoke dip in a bowl and surround it with chips or veggies for dipping. This method works great for larger gatherings. You can also serve the sliders as part of a buffet, where guests can grab their own. This makes it easy and fun for everyone to enjoy. For the full recipe, check out the details above.
Storage Info
Storing Leftovers
To keep your sliders fresh, store them in an airtight container. Place a layer of parchment paper between the sliders to avoid sticking. You can refrigerate them for up to three days. If you want to save them longer, freeze the sliders. Wrap them tightly in plastic wrap, then place them in a freezer bag. They can last for up to three months in the freezer.
Reheating Instructions
When you’re ready to enjoy your leftovers, reheating is key. For the best texture, use an oven. Preheat it to 350°F (175°C). Place the sliders on a baking sheet and cover them with foil. Heat for about 10-15 minutes until warmed through. If you prefer a quicker method, use the microwave. Set it to medium power and heat for 30 seconds to 1 minute. Check them often to avoid sogginess.
Shelf Life
You can safely store cooked sliders in the fridge for about three days. After that, the taste may change, and they might spoil. Signs of spoilage include an off smell or a change in texture. If you see mold, it’s best to throw them away. Always trust your senses when it comes to food safety.
FAQs
How can I make Spinach Artichoke Dip Sliders ahead of time?
You can prepare the filling earlier. Mix the cooked spinach, artichoke hearts, and cheeses. Store it in the fridge for up to two days. On serving day, slice your slider buns. Spread the filling on the bottom halves. Then, add the top buns and bake just before serving. This way, you save time and keep flavors fresh.
Can I use fresh spinach instead of cooked?
Yes, you can use fresh spinach! Chop it finely and sauté it briefly. This will soften the leaves. Use about 1.5 cups of fresh spinach for the same flavor. Make sure to cool it before adding to the dip. Sautéing will help release some moisture, making your dip creamy.
What can I serve with Spinach Artichoke Dip Sliders?
These sliders pair well with a few sides. Try serving them with a fresh salad or crispy veggies. A bowl of marinara sauce makes a great dip. You could also add some chips for crunch. Consider small bowls of olives or pickles to add variety to your platter.
Is this recipe suitable for large gatherings?
This recipe is perfect for parties! You can easily double or triple it. Just make sure to use a larger baking dish. If you want to make it easier, assemble the sliders the night before. Just pop them in the oven when guests arrive. This will keep everyone happy and satisfied!
This blog post covered how to make tasty Spinach Artichoke Dip Sliders. We looked at the key ingredients, potential swaps, and tools needed. I shared simple steps to prepare and bake the sliders. You learned tips for great flavor and how to store leftovers.
To wrap it up, these sliders are perfect for gatherings. They are easy to make and even more fun to share. Enjoy making them your own with flavors you love!

![To make these tasty knots, gather these ingredients: - 1 package (16 oz) refrigerated pizza dough - 4 tablespoons unsalted butter, melted - 3 cloves of garlic, finely minced - 1/2 cup freshly grated Parmesan cheese - 1 teaspoon dried Italian herbs (like oregano, basil, or thyme) - 1/4 teaspoon red pepper flakes (optional, for a little extra heat) - A pinch of salt, to taste - Fresh parsley, chopped, for garnish You can swap store-bought pizza dough for homemade dough if you prefer. Use any cheese you like, such as mozzarella or cheddar, for a different flavor. If you don’t have fresh garlic, garlic powder works too. For the herbs, dried ones are fine. If you want a kick, add more red pepper flakes or crushed black pepper. Fresh parsley adds a nice touch, but you can skip it if you want. Choose pizza dough that is near its expiration date. This helps ensure it’s soft and easy to work with. When picking garlic, look for firm bulbs without any sprouts or soft spots. For Parmesan cheese, choose a block you can grate yourself for the best flavor. If you buy pre-grated cheese, check the packaging for a good date. Fresh parsley should be vibrant and not wilted. These small details make a big difference in taste! Start by preheating your oven to 400°F (200°C). This helps the knots bake evenly. Next, grab a clean surface and lightly sprinkle it with flour. Roll out the pizza dough into a rectangle. Aim for a thickness of about 1/4 inch. This thickness gives the knots a nice, fluffy texture. Once you have your rectangle, cut the dough into strips. Each strip should measure about 1 inch wide and 6 inches long. This size is perfect for knot formation. Now comes the fun part: making the knots! For each strip, twist it gently and tuck one end through the loop. This creates a beautiful knot shape. Place these knots on a baking sheet lined with parchment paper. Make sure to leave space between each knot. This space allows them to rise and bake without sticking together. In a small bowl, combine melted butter, minced garlic, dried Italian herbs, red pepper flakes, and a pinch of salt. Mix this until it's well blended. This garlic butter mixture is key to flavor. Generously brush this mixture over each knot. Make sure every part is coated. This ensures your knots soak up all the deliciousness. After brushing, sprinkle freshly grated Parmesan cheese on top of each knot. This will melt and add a lovely, cheesy crust. Now, place the baking sheet in the oven. Bake for 15-20 minutes or until the knots turn golden brown. Once they’re done, let them cool for a few minutes. Finally, garnish with chopped parsley for that fresh flavor. Enjoy your Easy Garlic Parmesan Knots! For the full recipe, check out the [Full Recipe]. To make soft and fluffy garlic knots, you need to handle the dough gently. When you roll out the pizza dough, keep it about 1/4 inch thick. Cutting strips too thin can lead to crispy knots, which is not what we want. Always twist your knots tightly to ensure they hold their shape during baking. To enhance the flavor, use fresh garlic when making your garlic butter. Freshly minced garlic gives a strong, bold taste that dried garlic cannot match. Also, use high-quality Parmesan cheese for a rich, nutty flavor. If you like a bit of heat, add red pepper flakes. This little kick makes the knots even better. Bake your garlic knots at 400°F (200°C) for the best results. This temperature helps them rise nicely and get golden brown. Keep an eye on them after 15 minutes. Ovens can vary, so check for a golden color. If they need more time, add a few extra minutes. Always let them cool for a couple of minutes before serving. This lets the flavors settle and makes them easier to eat. For the full recipe, check the details above. {{image_4}} You can switch up the cheese in your garlic knots. Mozzarella gives a nice, gooey texture. Cheddar adds a sharp flavor. Feta offers a crumbly, salty kick. Each cheese brings its own twist. Try mixing different cheeses for a fun flavor blend. Want to spice things up? Add herbs like rosemary or thyme to your garlic butter. You can also try spices like paprika or cayenne for heat. Fresh basil adds a bright taste. These small changes create a new taste experience. Experiment with what you love! You can make these knots gluten-free easily. Use gluten-free pizza dough instead of regular dough. For a vegan twist, swap butter for oil and use nutritional yeast in place of cheese. These swaps let everyone enjoy your tasty knots. You can still keep them delicious! Check the Full Recipe for more tips. After you bake your garlic parmesan knots, let them cool down. Place any leftovers in an airtight container. This helps keep them fresh. You can store them at room temperature for up to two days. If you want them to last longer, move them to the fridge. They will stay good for about a week in there. When you are ready to enjoy your leftover knots, reheating them is easy. Preheat your oven to 350°F (175°C). Place the knots on a baking sheet and cover them with foil. This keeps them from drying out. Heat for about 10 minutes or until warm. You can also use a microwave, but they might get a bit chewy. If you have a lot of leftover knots, freezing is a great option. First, let them cool completely. Then, wrap each knot in plastic wrap. Place the wrapped knots in a freezer bag or container. Label the bag with the date. They can stay in the freezer for up to three months. To eat them, thaw in the fridge overnight, then reheat as mentioned above. For the full recipe, check out the details above. Garlic parmesan knots last about 2-3 days at room temperature. Store them in an airtight container to keep them fresh. If you want to extend their life, consider freezing them. They can last up to three months in the freezer. Just make sure to wrap them well to prevent freezer burn. Yes, you can make the dough ahead of time. Just prepare the dough and store it in the fridge for up to 24 hours. When you're ready to bake, let it sit at room temperature for about 30 minutes. This helps it relax and makes it easier to work with. You can serve garlic parmesan knots with marinara sauce for dipping. They also go well with garlic butter or a creamy ranch dressing. Pair them with your favorite pasta dish or a fresh salad for a complete meal. Yes, you can make these knots in advance! Prepare the knots and place them on a baking sheet. Cover them with plastic wrap and refrigerate for up to 2 hours before baking. When you're ready to eat, just take them out, let them sit for a few minutes, then bake as directed. Absolutely! You can use homemade pizza dough for these knots. Just ensure it is well-kneaded and has risen properly. This will give you a nice texture and flavor. You can find the full recipe for garlic parmesan knots using either type of dough. You now have a complete guide for making Easy Garlic Parmesan Knots. We covered the ingredients, step-by-step instructions, and tips for the best results. You learned about variations to suit your taste and how to store any leftovers. With this knowledge, you can create delicious knots each time. Remember, the key is fresh ingredients and proper baking techniques. Enjoy the process and make these knots your own!](https://tastyrecipes.blog/wp-content/uploads/2025/06/4f28ee24-23f7-48a3-a976-812a2e22feda-768x768.webp)

![- 2 large sweet potatoes - 1 cup black beans, drained and rinsed - 1 cup corn kernels (fresh or frozen) - 1 cup cherry tomatoes, halved - 1 ripe avocado, diced - 1/2 cup Greek yogurt or sour cream - 1/2 cup shredded cheddar cheese - 2 green onions, finely chopped - 1 teaspoon chili powder - Salt and freshly ground black pepper, to taste - Extra virgin olive oil for drizzling - Jalapeños for heat - Lime juice for zing - Fresh cilantro for garnish I love using sweet potatoes in my recipes. They are tasty and healthy. For this dish, you start with two large sweet potatoes. They will be the perfect base for our loaded skins. Next, black beans add a hearty texture and protein. One cup is all you need, drained and rinsed. Corn brings sweetness, so I add one cup of kernels, fresh or frozen. Cherry tomatoes, halved, add a burst of color and flavor. One cup is just right. Don’t forget the avocado! A ripe avocado, diced, brings creaminess. For a tangy touch, use half a cup of Greek yogurt or sour cream. Shredded cheddar cheese gives that cheesy goodness we all love. You will need half a cup for this dish. For some freshness, two green onions, finely chopped, do the job. A teaspoon of chili powder adds a nice kick. Finally, season with salt and freshly ground black pepper to taste. A drizzle of extra virgin olive oil adds richness. For an extra twist, consider optional ingredients. Jalapeños can spice things up. Lime juice adds a zing that brightens the dish. Fresh cilantro is great for garnish and adds a nice touch. You can find the full recipe and all the steps to create these delicious loaded sweet potato skins. Enjoy your cooking! 1. Preheat your oven to 400°F (200°C). This step helps roast the sweet potatoes evenly. 2. Clean the sweet potatoes under cold water. This removes dirt and debris. 3. Use a fork to poke holes all over each potato. This lets steam escape while cooking. 4. Roast the sweet potatoes on a baking sheet for 45-60 minutes. They should be fork-tender when done. 1. In a large bowl, mix together black beans, corn, halved cherry tomatoes, and chili powder. 2. Add salt and pepper to taste. This adds flavor to your filling. 3. Stir in half of the chopped green onions. This gives your filling a fresh taste. 4. After the sweet potatoes cool, cut them in half lengthwise. Scoop out some flesh, leaving a 1/4-inch border. 5. Fill each sweet potato half with the bean and corn mixture. Press down gently to secure it. 1. Top each filled sweet potato skin with shredded cheddar cheese. This will melt and create a tasty topping. 2. Place the stuffed skins back in the oven. Bake for 10-15 minutes, until the cheese is melted and bubbly. 3. Remove from the oven and cool for a couple of minutes. 4. Top each skin with diced avocado, a dollop of Greek yogurt, and the remaining green onions. 5. Serve warm to enjoy all the flavors. For the full recipe, check the section above. - Avoid overcooking sweet potatoes for optimal texture. Cook them until just soft. - Utilize an instant-read thermometer for the best results. Aim for around 205°F (96°C). - Pair with a salad for a complete meal. Greens add crunch and freshness. - Add a side of salsa or guacamole for extra flavor. These dips enhance every bite. - Use a beautiful serving platter. A nice plate makes the dish more inviting. - Garnish with fresh herbs for an inviting look. Chopped cilantro or parsley can brighten it up. If you want to create Loaded Sweet Potato Skins, check out the [Full Recipe]. {{image_4}} You can change up the filling to suit your taste. For a protein boost, substitute quinoa or chickpeas. These options add more texture and nutrition. You can also add sautéed bell peppers. They bring a sweet and smoky flavor that complements the sweet potatoes. If you have dietary needs, you can easily adjust this recipe. Use certified gluten-free ingredients to make it safe for those with gluten issues. For a dairy-free option, try using vegan cheese instead of regular cheese. It melts well and tastes great. Why not add a global flair to your dish? Try a Mediterranean version by adding feta cheese and olives. This brings a salty and tangy kick. For a fun twist, experiment with taco-flavored spices. This gives a Tex-Mex flair that is sure to impress. For the full recipe, check out Loaded Sweet Potato Skins Delight. Store your leftover sweet potato skins in the fridge. Use an airtight container to keep them fresh. They will stay good for up to 3 days. When it's time to eat them again, reheat them in the oven. This method helps keep their texture nice and crisp. If you want to save time, freeze the unbaked assembled skins. This way, you can enjoy them later. Just make sure to thaw them before baking. Thawing will ensure they bake evenly and taste delicious. For the best results, use an air fryer to reheat your skins. This method gives them a nice crisp. Try to avoid using the microwave if you can. Microwaving can make them soggy and less tasty. Yes, you can prepare and assemble ahead of time. Simply bake the sweet potatoes and scoop out the flesh. Mix your filling and store it separately. When you’re ready, fill the skins and bake them. This saves time and makes serving easy! They can last up to 3 days when stored correctly. Keep them in an airtight container. This way, you can enjoy leftovers without worry. Just reheat before serving for the best taste. They are a nutritious option, rich in fiber and vitamins. Sweet potatoes pack a healthy punch, and the toppings add more nutrients. Black beans and corn provide protein and minerals. Plus, you can adjust toppings for your dietary needs. Serve warm with garnishes for added freshness and flavor. Diced avocado and green onions add a nice touch. A dollop of Greek yogurt or sour cream gives creaminess. For the full recipe, check the details above and make this tasty dish! Loaded sweet potato skins make a tasty and healthy dish. We covered all the key parts: ingredients, steps, tips, and storage. With fresh flavors and easy prep, you'll enjoy making these. Plus, you can modify the recipe to fit your needs. These skins are perfect for meals or snacks. Give them a try! You’ll love how fun and delicious they are. Happy cooking!](https://tastyrecipes.blog/wp-content/uploads/2025/07/f73bf44f-0c34-4b8d-b873-c3dffb8956e2-768x768.webp)